This content originally appeared on DEV Community and was authored by uttesh
 Live Demo: FPML Chatbot
 GitHub Repository: FPML Chatbot on GitHub
 Introduction
FPML (Financial Products Markup Language) is widely used for reporting and processing financial trades.
However, querying and understanding FPML XSD (XML Schema Definition) files can be complex.
This chatbot simplifies FPML queries by allowing users to:
 Search FPML elements with Autocomplete
Use fuzzy search for better results
Get structured metadata for each field
Access it online via GitHub Pages
 Features
 Query FPML 5.12 schema elements easily
 Fuzzy search support (handles typos & partial matches)
 Simple and clean chat UI (built with Material UI)
 Hosted on GitHub Pages for easy access
Getting Started
1⃣ Clone the Repository
git clone https://github.com/uttesh/fpml-chatbot.git
cd fpml-chatbot
2⃣ Install Dependencies
yarn install
3⃣ Run Locally
yarn start
The chatbot will start on http://localhost:3000.
Converting FPML XSD Files to JSON Using Python
To ensure the FPML chatbot has structured data, we need to convert FPML 5.12 XSD files into JSON.
 Step 1: Install Required Libraries
Ensure you have xmltodict installed for XML parsing:
pip install xmltodict
Step 2: Python Script to Convert XSD to JSON
 convert_xsd_to_json.py
import os
import json
import xmltodict

# 📌 Directory containing FPML XSD files
XSD_FOLDER = "fpml_xsd_files"

# 📌 Function to parse XSD and extract elements
def parse_xsd(file_path):
    with open(file_path, "r", encoding="utf-8") as file:
        xml_data = file.read()

    parsed_data = xmltodict.parse(xml_data)
    elements = []

    # Navigate the XSD structure
    schema = parsed_data.get("xs:schema", {})
    for element in schema.get("xs:element", []):
        elements.append({
            "name": element.get("@name"),
            "type": element.get("@type", "complexType"),
            "minOccurs": element.get("@minOccurs", "1"),
            "maxOccurs": element.get("@maxOccurs", "1"),
            "documentation": element.get("xs:annotation", {}).get("xs:documentation", {}).get("#text", "No documentation available."),
        })

    return elements

# 📌 Iterate over all XSD files
all_elements = {}
for filename in os.listdir(XSD_FOLDER):
    if filename.endswith(".xsd"):
        file_path = os.path.join(XSD_FOLDER, filename)
        all_elements[filename] = parse_xsd(file_path)

# 📌 Save extracted FPML messages to JSON
output_file = "fpml_5_12_messages.json"
with open(output_file, "w", encoding="utf-8") as json_file:
    json.dump(all_elements, json_file, indent=4)

print(f"✅ FPML 5.12 JSON file generated successfully: {output_file}")
Step 3: Run the Script
python convert_xsd_to_json.py
Step 4: Sample JSON Output (fpml_5_12_messages.json)
{
    "fpml-main-5-12.xsd": [
        {
            "name": "Trade",
            "type": "complexType",
            "minOccurs": "1",
            "maxOccurs": "1",
            "documentation": "A trade represents an individual transaction."
        },
        {
            "name": "Party",
            "type": "complexType",
            "minOccurs": "1",
            "maxOccurs": "unbounded",
            "documentation": "A party involved in the trade."
        }
    ]
}
 Why This is Important?
Extracts structured metadata from FPML XSD files
Makes FPML elements easy to search & use in the chatbot
Converts complex XSD files into a simple JSON format
Now, your chatbot can dynamically load FPML schema data!
 How It Works
1⃣ FPML XSD Data (Extracting from JSON)
The chatbot parses FPML XSD files into structured JSON data. Used the Python code to convert the XSD to JSON, it’s inside generator folder.
Example JSON Structure (merged_xsd_attributes.json):
[
  {
    "name": "Trade",
    "type": "complexType",
    "documentation": "Represents a financial trade.",
    "minOccurs": "1",
    "maxOccurs": "1"
  },
  {
    "name": "NotionalAmount",
    "type": "decimal",
    "documentation": "The principal amount of the trade.",
    "minOccurs": "1",
    "maxOccurs": "1"
  }
]
2⃣ Implementing Autocomplete & Fuzzy Search
We use Material UI’s Autocomplete and fuse.js for fuzzy search.
Implementing Fuzzy Search
import Fuse from "fuse.js";
const fuse = new Fuse(xsdElements, { keys: ["label"], threshold: 0.2 });
Filtering & Updating Autocomplete
<Autocomplete
  options={fuse.search(input).map((result) => result.item)} // Dynamically filter
  getOptionLabel={(option) => option.label || ""}
  onInputChange={(_, newInputValue) => setInput(newInputValue)}
  renderInput={(params) => <TextField {...params} fullWidth placeholder="Search FPML elements..." />}
  sx={{ width: "70%" }}
/>
3⃣ Handling User Messages in the Chatbot
const handleSend = () => {
  if (!input.trim()) return;

  const userMessage = { sender: "user", text: input };
  setMessages((prev) => [...prev, userMessage]);

  const result = fuse.search(input);
  const foundElement = result.length > 0 ? result[0].item : null;

  const responseText = foundElement
    ? `Field Name: ${foundElement.label}\nData Type: ${foundElement.value}\nExplanation:\n${foundElement.documentation}`
    : "No matching field found.";

  setMessages((prev) => [...prev, { sender: "bot", text: responseText }]);
  setInput("");
};
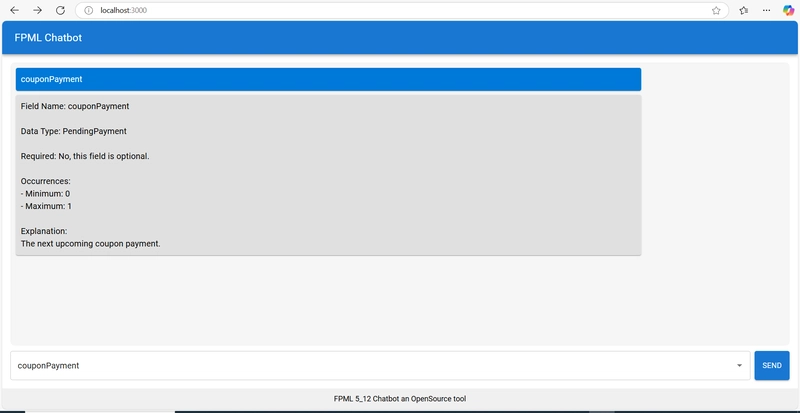
 Full Chatbot UI
This is the final chatbot UI using Material UI:
<Box sx={{ height: "100vh", display: "flex", flexDirection: "column" }}>
  <AppBar position="static">
    <Toolbar>
      <Typography variant="h6">FPML Chatbot</Typography>
    </Toolbar>
  </AppBar>

  <Box sx={{ flex: 1, p: 2, display: "flex", flexDirection: "column" }}>
    <Box ref={chatContainerRef} sx={{ flex: 1, overflowY: "auto", p: 2 }}>
      {messages.map((message, index) => (
        <Paper key={index} sx={{ p: 2, mb: 2, alignSelf: message.sender === "user" ? "flex-end" : "flex-start" }}>
          <Typography>{message.text}</Typography>
        </Paper>
      ))}
    </Box>

    <Box sx={{ display: "flex", gap: "8px", mt: 2 }}>
      <Autocomplete
        options={fuse.search(input).map((r) => r.item)}
        getOptionLabel={(option) => option.label || ""}
        onInputChange={(_, newValue) => setInput(newValue)}
        renderInput={(params) => <TextField {...params} fullWidth placeholder="Search FPML elements..." />}
        sx={{ width: "70%" }}
      />
      <Button variant="contained" color="primary" onClick={handleSend}>
        Send
      </Button>
    </Box>
  </Box>
</Box>
 Contributing
Want to improve this chatbot? Follow these steps:
1⃣ Fork the Repository
Go to GitHub Repo and click Fork.
2⃣ Clone the Repo
git clone https://github.com/uttesh/fpml-chatbot.git
cd fpml-chatbot
3⃣ Create a New Branch
git checkout -b feature-new-improvement
4⃣ Make Changes & Push
git add .
git commit -m "Added new feature"
git push origin feature-new-improvement
5⃣ Create a Pull Request
Go to GitHub → Click Pull Request → Submit your changes! 
Start Using the FPML Chatbot Today!
Try it now: Live Chatbot
Star the repo  : GitHub Repository
Final Thoughts
This FPML chatbot simplifies working with financial schema data. With fuzzy search, Material UI, and GitHub Pages hosting, it’s a powerful yet simple tool for developers and financial analysts.
 Have ideas for improvements? Let’s collaborate!
This content originally appeared on DEV Community and was authored by uttesh