This content originally appeared on Level Up Coding – Medium and was authored by Itsuki
Draw Shape, Path, Text! Transform! Gradient! Pattern! Animate! And more!
In one of my previous articles, we have token a look at Draw Text and Shape on Images.
Here, let’s check out how we can create some SVGs with the svg crate!
However!
Before we start, please let me point this out!
This svg crate is more like a wrapper!
Doesn’t have those Rust-y things you might be looking for! No type checks, nothing!
And!
If you are not used to how SVGs work themselves, this crate can be fairly hard to use! (If that’s the case, I will seriously recommend giving this Introducing SVG from scratch page from Mozilla a read!)
In this article, we will first be checking out the basic idea of using the svg crate to create SVGs. I will then be sharing with you a BUNCH of examples in drawing different elements including Path, Shapes, adding animations, applying transformations, and more! So that you can just grab those, making some modifications, combining different bits and bytes, to achieve what you want!
I addition, I will also make a little note on parsing SVGs with this crate at the end if you are interested!
Let’s start!
Basic Usage
Let’s draw a simple circle!
This is just my personal preference when using this svg crate, but I always start with the final SVG I want, and work backwards.
<svg width="300" height="200" xmlns="http://www.w3.org/2000/svg">
  <circle cx="150" cy="100" r="80" fill="green" />
</svg>

Translate that into code, here is what we have. We will break it down a little more in couple seconds.
fn draw_circle() -> anyhow::Result<()> {
    let circle = Circle::new()
        .set("cx", "150")
        .set("cy", "100")
        .set("r", "80")
        .set("fill", "green");

    let svg_document = Document::new()
        .set("width", "300")
        .set("height", "200")
        .add(circle);

    svg::save("circle.svg", &svg_document)?;
    Ok(())
}
If we open the circle.svg as text, exactly the same as what we started with!
<svg height="200" width="300" xmlns="http://www.w3.org/2000/svg">
<circle cx="150" cy="100" fill="green" r="80"/>
</svg>
Now, let’s take a little look at what we actually had above in our draw_circle function!
First of all, we get our Circle. It is an element node.
And for pretty much all (if not all) element nodes, we can
- Create a new node with new. Depending on the node type, for example, Text, we can pass in some additional parameters when creating.
- Assign attributes with set. As we can see here, since the svg crate is just a wrapper, we get no checks on the attributes. Not on the key, not on the value!
- Append other nodes with add.
We then have the Document, which is actually just a type alias to node::element::SVG, representing the svg node. And since it is just another element node, we create and set attributes the exact same way as above!
Lastly, we save the SVG by using save.
For a list of available items (nodes, elements, functions) in the crate, see all svg’s items here!
Some Examples
Above is all we need to know about using the svg crate to compose SVGs, time for some examples!
Path
First of all, I hope you are familiar with SVG Position/coordinate system which is defined like following.

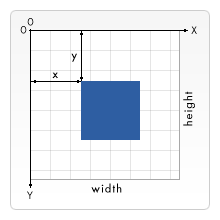
SVG
<svg width="190" height="160" xmlns="http://www.w3.org/2000/svg">
  <path
    d="M 10 80 Q 52.5 10, 95 80 T 180 80"
    stroke="red"
    fill="transparent" />
</svg>

Rust Code
fn draw_path() -> anyhow::Result<()> {
    // d="M 10 80 Q 52.5 10, 95 80 T 180 80"
    let data = Data::new()
        .move_to((10, 80))
        .quadratic_curve_to(((52.5, 10), (95, 80))) // or (52.5, 10, 95, 80))
        .smooth_quadratic_curve_to((180, 80)); // same a T command

    // <path
    //     d="M 10 80 Q 52.5 10, 95 80 T 180 80"
    //     stroke="black"
    //     fill="transparent" />
    let path = Path::new()
        .set("fill", "transparent")
        .set("stroke", "red")
        .set("d", data);

    // <svg width="190" height="160" xmlns="http://www.w3.org/2000/svg">
    let svg_document = Document::new()
        .set("width", "190")
        .set("height", "160")
        .add(path);

    svg::save("quad.svg", &svg_document)?;
    Ok(())
}
Couple points here on the Data, referring to the parameter d.
- For drawing quadratic or other curve types theres is also the by version, for example quadratic_curve_by, for dx dy.
- Just like the smooth_quadratic_curve_to is the T command for stringing together multiple quadratic Béziers, we also have the smooth_cubic_curve_to and smooth_cubic_curve_by for the S command.
Here is a list of available commands for drawing Path.
Basic Text & Span
SVG
<svg height="30" width="200" xmlns="http://www.w3.org/2000/svg">
  <text fill="pink" font-family="Courier New" font-size="18" x="10" y="20">
  Hello from
  <tspan font-weight="bold">Itsuki</tspan>
  </text>
</svg>

Rust Code
fn draw_text() -> anyhow::Result<()> {
    let span = TSpan::new("Itsuki").set("font-weight", "bold");

    let text = Text::new("Hello from ")
        .add(span)
        .set("x", 10)
        .set("y", 20)
        .set("fill", "pink")
        .set("font-family", "Courier New")
        .set("font-size", "18");

    let svg_document = Document::new()
        .set("width", "200")
        .set("height", "30")
        .add(text);

    svg::save("textspan.svg", &svg_document)?;
    Ok(())
}
Here is a list of properties that can be set as an attribute or via a CSS declaration: font-family, font-style, font-weight, font-variant, font-stretch, font-size, font-size-adjust, letter-spacing, word-spacing and text-decoration.
Text Path
SVG
<svg height="80" width="200" xmlns="http://www.w3.org/2000/svg">
<text fill="pink" font-family="Courier New" font-size="18" x="10" y="20">
<textPath href="#Path" xmlns:xlink="http://www.w3.org/1999/xlink">Hello from Itsuki</textPath>
</text>
<path d="M20,20 C80,60,100,40,120,20 T180,80" fill="transparent" id="Path"/>
</svg>

Rust Code
fn draw_textpath() -> anyhow::Result<()> {
    let data = Data::new()
        .move_to((20, 20))
        .cubic_curve_to(((80, 60), (100, 40), (120, 20))) // or (52.5, 10, 95, 80))
        .smooth_quadratic_curve_to((180, 80)); // same a T command

    let path_id = "Path";

    let path = Path::new()
        .set("id", path_id)
        .set("fill", "transparent")
        .set("d", data);

    let text_path = TextPath::new("Hello from Itsuki")
        .set("xmlns:xlink", "http://www.w3.org/1999/xlink")
        .set("href", format!("#{}", path_id));

    let text = Text::new("")
        .add(text_path)
        .set("x", 10)
        .set("y", 20)
        .set("fill", "pink")
        .set("font-family", "Courier New")
        .set("font-size", "18");

    let svg_document = Document::new()
        .set("width", "200")
        .set("height", "80")
        .add(text)
        .add(path);

    svg::save("textpath.svg", &svg_document)?;
    Ok(())
}
Animation
SVG
<svg height="100" width="300" xmlns="http://www.w3.org/2000/svg">
<rect height="100" stroke="red" width="300" x="0" y="0"/>
<circle cx="0" cy="50" fill="blue" r="15">
<animate attributeName="cx" dur="5s" from="0" repeatCount="indefinite" to="500"/>
</circle>
</svg>

Rust Code
 fn draw_animate() -> anyhow::Result<()> {
    let rect = Rectangle::new()
        .set("x", "0")
        .set("y", "0")
        .set("width", "300")
        .set("height", "100")
        .set("stroke", "red");

    let animate = Animate::new()
        .set("attributeName", "cx")
        .set("from", "0")
        .set("to", "500")
        .set("dur", "5s")
        .set("repeatCount", "indefinite");

    let circle = Circle::new()
        .set("cx", "0")
        .set("cy", "50")
        .set("r", "15")
        .set("fill", "blue")
        .add(animate);

    let svg_document = Document::new()
        .set("width", "300")
        .set("height", "100")
        .add(rect)
        .add(circle);

    svg::save("animate.svg", &svg_document)?;
    Ok(())
}
Gradient
SVG
<svg height="200" width="300" xmlns="http://www.w3.org/2000/svg">
  <defs>
    <linearGradient id="Gradient" x1="0" x2="0" y1="0" y2="1">
      <stop offset="0%" stop-color="red"/>
      <stop offset="50%" stop-color="yellow" stop-opacity="0"/>
      <stop offset="100%" stop-color="blue"/>
    </linearGradient>
  </defs>
  <circle cx="150" cy="100" fill="url(#Gradient)" r="80"/>
</svg>

Rust Code
fn draw_gradient() -> anyhow::Result<()> {
    let gradient_id = "Gradient";
    let linear_gradient = LinearGradient::new()
        .set("id", gradient_id)
        .set("x1", "0")
        .set("x2", "0")
        .set("y1", "0")
        .set("y2", "1")
        .add(Stop::new().set("offset", "0%").set("stop-color", "red"))
        .add(
            Stop::new()
                .set("offset", "50%")
                .set("stop-color", "yellow")
                .set("stop-opacity", "0"),
        )
        .add(Stop::new().set("offset", "100%").set("stop-color", "blue"));

    let definition = Definitions::new().add(linear_gradient);

    let circle = Circle::new()
        .set("cx", "150")
        .set("cy", "100")
        .set("r", "80")
        .set("fill", format!("url(#{})", gradient_id));

    let svg_document = Document::new()
        .set("width", "300")
        .set("height", "200")
        .add(circle)
        .add(definition);

    svg::save("gradient.svg", &svg_document)?;
    Ok(())
}
And of course, we have node::element::RadialGradient as well.
Pattern
SVG
<svg height="200" width="200" xmlns="http://www.w3.org/2000/svg">
<rect fill="url(#Pattern)" height="200" stroke="red" width="200"/>
<defs>
<pattern height="0.25" id="Pattern" width="0.25" x="0" y="0">
<rect fill="skyblue" height="25" width="25" x="0" y="0"/>
<circle cx="25" cy="25" fill="red" fill-opacity="0.5" r="20"/>
</pattern>
</defs>
</svg>

Rust Code
fn draw_pattern() -> anyhow::Result<()> {
let pattern_id = "Pattern";
let pattern = Pattern::new()
.set("id", pattern_id)
.set("x", "0")
.set("y", "0")
.set("width", "0.25")
.set("height", "0.25")
.add(
Rectangle::new()
.set("x", "0")
.set("y", "0")
.set("width", "25")
.set("height", "25")
.set("fill", "skyblue"),
)
.add(
Circle::new()
.set("cx", "25")
.set("cy", "25")
.set("r", "20")
.set("fill", "red")
.set("fill-opacity", "0.5"),
);
let definition = Definitions::new().add(pattern);
let rect = Rectangle::new()
.set("fill", format!("url(#{})", pattern_id))
.set("stroke", "red")
.set("width", "200")
.set("height", "200");
let svg_document = Document::new()
.set("width", "200")
.set("height", "200")
.add(rect)
.add(definition);
svg::save("pattern.svg", &svg_document)?;
Ok(())
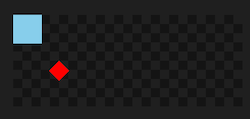
}Transform
SVG
<svg height="80" width="200" xmlns="http://www.w3.org/2000/svg">
<rect fill="skyblue" height="25" width="25" x="0" y="0"/>
<rect fill="red" height="25" transform="translate(40,40) rotate(45) scale(0.5)" width="25" x="0" y="0"/>
</svg>
Rust Code
fn draw_transform() -> anyhow::Result<()> {
    let rect = Rectangle::new()
        .set("x", "0")
        .set("y", "0")
        .set("width", "25")
        .set("height", "25")
        .set("fill", "skyblue");

    let rect_transform = rect
        .clone()
        .set("fill", "red")
        .set("transform", "translate(40,40) rotate(45) scale(0.5)");

    let svg_document = Document::new()
        .set("width", "200")
        .set("height", "80")
        .add(rect)
        .add(rect_transform);

    svg::save("transform.svg", &svg_document)?;
    Ok(())
}
Clipping
SVG
<svg height="200" width="200" xmlns="http://www.w3.org/2000/svg">
<defs>
<clipPath id="cut-off-bottom">
<rect height="100" width="100" x="0" y="0"/>
</clipPath>
</defs>
<circle clip-path="url(#cut-off-bottom)" cx="100" cy="100" fill="red" fill-opacity="0.5" r="100"/>
</svg>

Rust Code
fn draw_clip() -> anyhow::Result<()> {
    let clip_id = "left-upper";
    let clip = ClipPath::new().set("id", clip_id).add(
        Rectangle::new()
            .set("x", "0")
            .set("y", "0")
            .set("width", "100")
            .set("height", "100"),
    );
    let defs = Definitions::new().add(clip);

    let circle = Circle::new()
        .set("cx", "100")
        .set("cy", "100")
        .set("r", "100")
        .set("clip-path", format!("url(#{})", clip_id))
        .set("fill", "red")
        .set("fill-opacity", "0.5");

    let svg_document = Document::new()
        .set("width", "200")
        .set("height", "200")
        .add(defs)
        .add(circle);

    svg::save("clip.svg", &svg_document)?;
    Ok(())
}
A Little Note on Loading/Parsing Existing SVG
Above is all I have for generating/composing SVG, to finish this article up, I would like to make a little note on reading existing SVGs.
This svg crate does provide a parsing functionality, but I have to say, it is NOT GREAT!
What do I meant?
First of all, to read in contents from an SVG file, we can use the open function.
let mut content: String = String::new();
svg::open("circle.svg", &mut content)?;
println!("{content}");
// <svg height="200" width="300" xmlns="http://www.w3.org/2000/svg">
// <circle cx="150" cy="100" fill="green" r="80"/>
// </svg>
However, as we can see here, all we get is a simple String!
Can we parse it to Document, ie: node::element::SVG, directly?
Unfortunately, nope!
We will actually have to loop through the Event and create all those nodes by ourselves!
for event in svg::open(path, &mut content)? {
    match event {
        svg::parser::Event::Tag(tag, r#type, attributes) => {
            println!("{}: {:?}", tag, r#type);
            if tag == "path" {
                if let Some(data) = attributes.get("d") {
                    let data = Data::parse(data).unwrap();
                    for command in data.iter() {
                        match command {
                            &node::element::path::Command::Move(..) => { /* … */ }
                            &node::element::path::Command::Line(..) => { /* … */ }
                            _ => {}
                        }
                    }
                }
            }
        }
        svg::parser::Event::Text(content) => {
            println!("{}", content)
        }
        _ => {}
    }
}
I have left out couple Event cases here, but here is what we might have for a given Event.
pub enum Event<'l> {
    Error(Error),
    Tag(&'l str, Type, Attributes),
    Text(&'l str),
    Comment,
    Declaration,
    Instruction,
}
Thank you for reading!
That’s it for this article!
Of course, there are a lot more we can do with SVG! Masking, Effects, Filters!
Give it a try yourself!
Happy SVG-composing!
Rust: Create SVG Images was originally published in Level Up Coding on Medium, where people are continuing the conversation by highlighting and responding to this story.
This content originally appeared on Level Up Coding – Medium and was authored by Itsuki