This content originally appeared on Level Up Coding – Medium and was authored by M Sadewa Wicaksana
A practical walkthrough for setting up NAT Instances in AWS to enable secure, controlled internet access for private subnets — complete with tips, pitfalls, and best practices.
This story began when disaster struck at my office — our entire collection of backup images and files vanished after a catastrophic data center crash. To make matters worse, all my configuration files were gone too. I had no choice but to start from scratch, rebuilding everything. Faced with this challenge, I needed to find a way to replicate our production environment as accurately as possible, just like it would be in a real-world deployment.
Since I’m most familiar with Amazon AWS compared to other cloud services, I chose it as my cloud provider. Honestly, I find AWS easier to configure and learn. Why? Because if you’re already comfortable managing traditional VPS instances with monthly payments, switching to AWS only requires learning a few new concepts and making small adjustments.

Intro
In our previous production environment, we only had one public IP address, while the rest of the servers operated on an intranet using private IPs. You can imagine that illustration like a housing area with one gate systems. On cloud platforms like AWS or Google Cloud, instances with only private IPs can’t directly access the internet. To enable that access, there are a few options — most commonly using a NAT Instance or a NAT Gateway. Each approach comes with its own advantages and trade-offs.
NAT Instance is often used for small production environments because the cost is cheaper, it also need an effort for manual configurations, but for high productions this approach is not the best options, because we depend on the one instances which we are used as core to access internet.
On the other hand, NAT Gateway is more expensive from the cost, but for the maintenance, availability, scaling, and failover is flexible and fully managed by the cloud provider. I’ll explain more on the next article about implementing NAT Gateway.
On this article I’ll explain about implementing NAT Instance, honestly why I pick a NAT INSTANCE rather than NAT GATEWAY because the price is more cheaper. I had an experince using NAT GATEWAY and with 10 days maybe the price is more than $10 for the staging environment only. Is a much expensive btw. 
Design and Implementation

The design network infrastructure NAT Instance which I want to build is such like that. The instance which had public ip we can called it as lbsrv which can connect to the internet using internet gateway. The other instances which encapsulated on the private instance can access internet through instance lbsrv.
To create an instance like that follow these steps:
- Create VPC (Virtual Private Cloud)
On the field IPv4 CIDR, used 25.0.0.0/16. But Actually you can defined it by yourself such as using 10.0.0.0/16 or the others.

2. Create two subnet public and private
- Public Subnet: 25.0.0.0/24 for VPC using 25.0.0.0 and 10.0.0.0/24 for VPC using 10.0.0.0 just ensure that the subnet is still on the range of VPC IP
- Private Subnet: 25.0.1.0/24 for VPC using 25.0.0.0


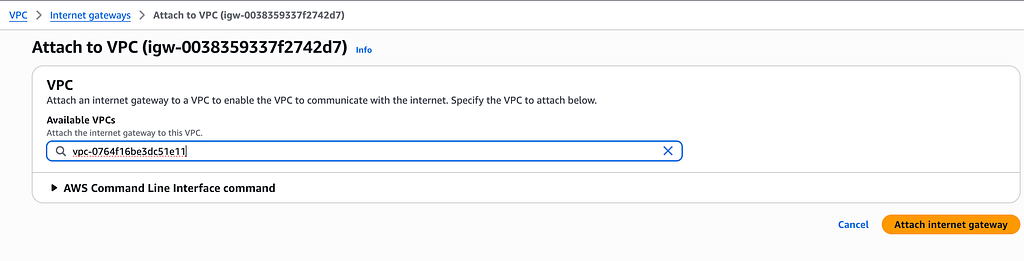
3. Create internet gateway

Click on the detail of internet gateway and attach internet gateway into the VPC sidita-dev.

4. Create two route tables public and private


Click the detail of public-rt-sidita-dev on the list of route tables, and add internet gateway on the routes with choose Edit routes, then finally on tab subnet associations add public-subnet-sidita-dev with choose the Edit subnet associations.


5. Create the security group to make our EC2 instance easy to manage, for now just allow all traffic from the outbound and inbound traffics. But you can change it with specific later for security considerations.


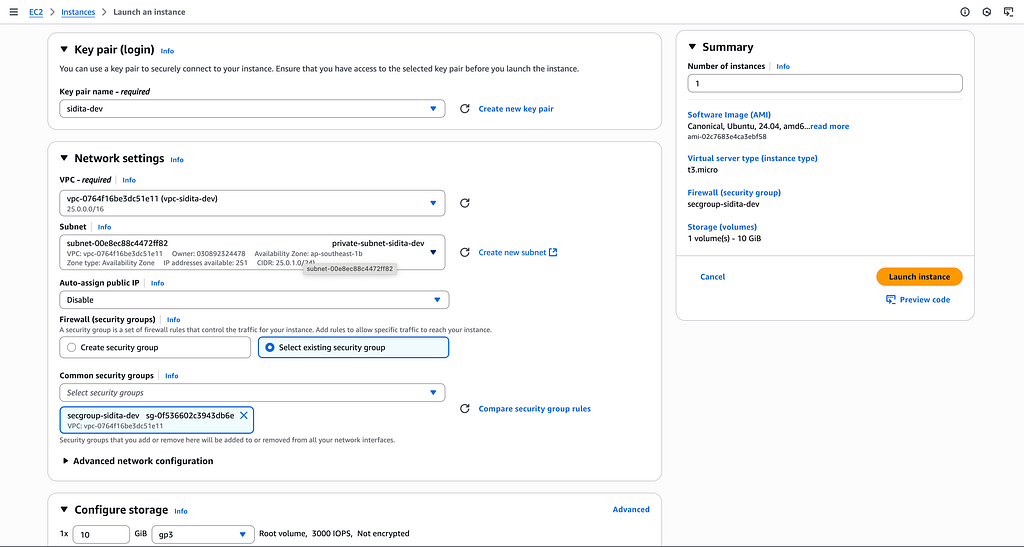
6. Create EC2 Instance for public and private subnet. We can illustrate public subnet as the lbsrv and the private subnet is the layer of our applications infrastructure such as database, file, and applications.
## public
name: lbsrv-apps
ami: Ubuntu Server 24.04 LTS
architecture: 64-bit (x86)
instance-type: t3.micro
key pair: create new key pair (sidita-dev.pem)
network settings: (edit)
  vpc: vpc-sidita-dev
  subnet: public-subnet-sidita-dev
  firewall: secgroup-sidita-dev
  auto-assign public ip: enable


## private
name: dbsrv-apps
ami: Ubuntu Server 24.04 LTS
architecture: 64-bit (x86)
instance-type: t3.micro
key pair: create new key pair (sidita-dev.pem)
network settings: (edit)
  vpc: vpc-sidita-dev
  subnet: public-subnet-sidita-dev
  firewall: secgroup-sidita-dev
  auto-assign public ip: disable


7. Connect to public instances and private instances. To connect in the private instances tried to access from public instances. Usually I used termius as the tools for ssh client.


Private instance is still can’t reach internet because we not yet connect the private instances to the public instances.
8. Connect route tables private into the instances public and add subnet associations


9. Config the public and private instances
## Public Instances
sudo nano /etc/sysctl.d/custom-ip-forwarding.conf
# add this syntax
###
net.ipv4.ip_forward = 1
###
sudo sysctl -p /etc/sysctl.d/custom-ip-forwarding.conf

# install the net-tools on public instances
sudo apt install net-tools
netstat -i
###Kernel Interface table
###Iface             MTU    RX-OK RX-ERR RX-DRP RX-OVR    TX-OK TX-ERR TX-DRP TX-OVR Flg
###ens5             9001   146970      0      0 0         10664      0      0      0 BMRU
###lo              65536      362      0      0 0           362      0      0      0 LRU

From that informations we can see that the main route for that network is on the ens5. Therefore run this command on public instances
sudo apt-get install iptables-persistent -y
##save the current ip
sudo iptables -t nat -A POSTROUTING -o ens5 -j MASQUERADE
sudo iptables -F FORWARD
sudo netfilter-persistent save
ens5 is dynamic check first which the main route networks in your instances
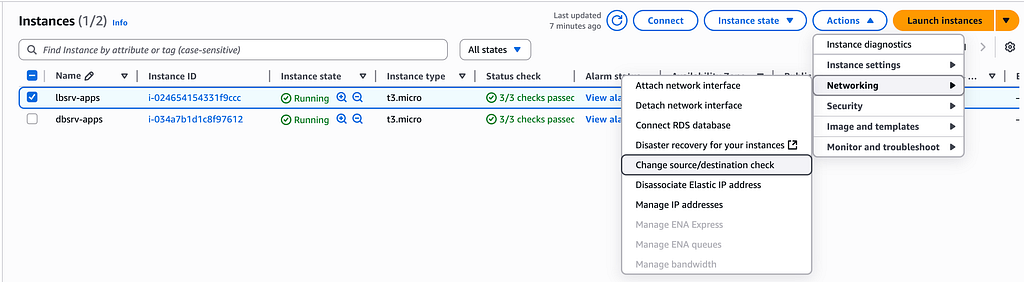
On the public instances disable the source and destination check, to illustrate as the image below

Finally, we need to login in the private instances and tried to ping the google.com to ensure that our private instances can reach the google internet.

Great!!! Now our private instances can reach the internet. 

 That’s my story and thanks you read it ’til the end.
If you have any questions, need further clarification, or wish to discuss technology-related topics, feel free to reach out to me via email. I’m always open to sharing insights, collaborating on projects, or offering guidance on your tech journey. Let’s connect and build something amazing together! wicaksanasadewa@proton.me
AWS NAT Instances Explained: Secure Internet Access for Private Subnets was originally published in Level Up Coding on Medium, where people are continuing the conversation by highlighting and responding to this story.
This content originally appeared on Level Up Coding – Medium and was authored by M Sadewa Wicaksana