This content originally appeared on Level Up Coding – Medium and was authored by Federico Grenoville
If you’ve ever wondered what powers the physics engine in Unreal Engine, and what terms like integration, substepping, or async transform really mean, you’re in the right place!
In a game engine, the physics engine simulates the objects’ physical behavior within the scene, making their interactions more realistic. Its main functions include:
· Rigid body dynamics — Manages the motion and collisions of solid objects based on physical laws.
· Collision detection — Determines when and where two objects touch in space.
· Collision response — Decides what happens as a result of a contact.
· Constraint and joint handling — Allow connections between objects, which may be rigid or flexible.
· Soft body physics — Simulates deformable materials.
How does the physics engine compute all this?
At the core of it all lie the concepts of position, velocity, and acceleration.
From classical Newtonian mechanics, we know that to change an object’s state, we need to apply a force.
A force generates an acceleration, which changes the velocity, which in turn alters the position.
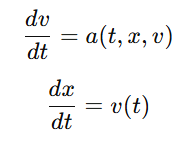
We can say that velocity is the derivative of position over time, and acceleration is the derivative of velocity over time.
To compute how position and velocity evolve over time, we need to solve two differential equations:
Around 1768, Euler developed a simple method to estimate solutions without complex math involved.
Based on the definition of a derivative as a rate of change, the idea is: if you know a function’s value at a given time, you can use its derivative to predict where it will be a moment later.
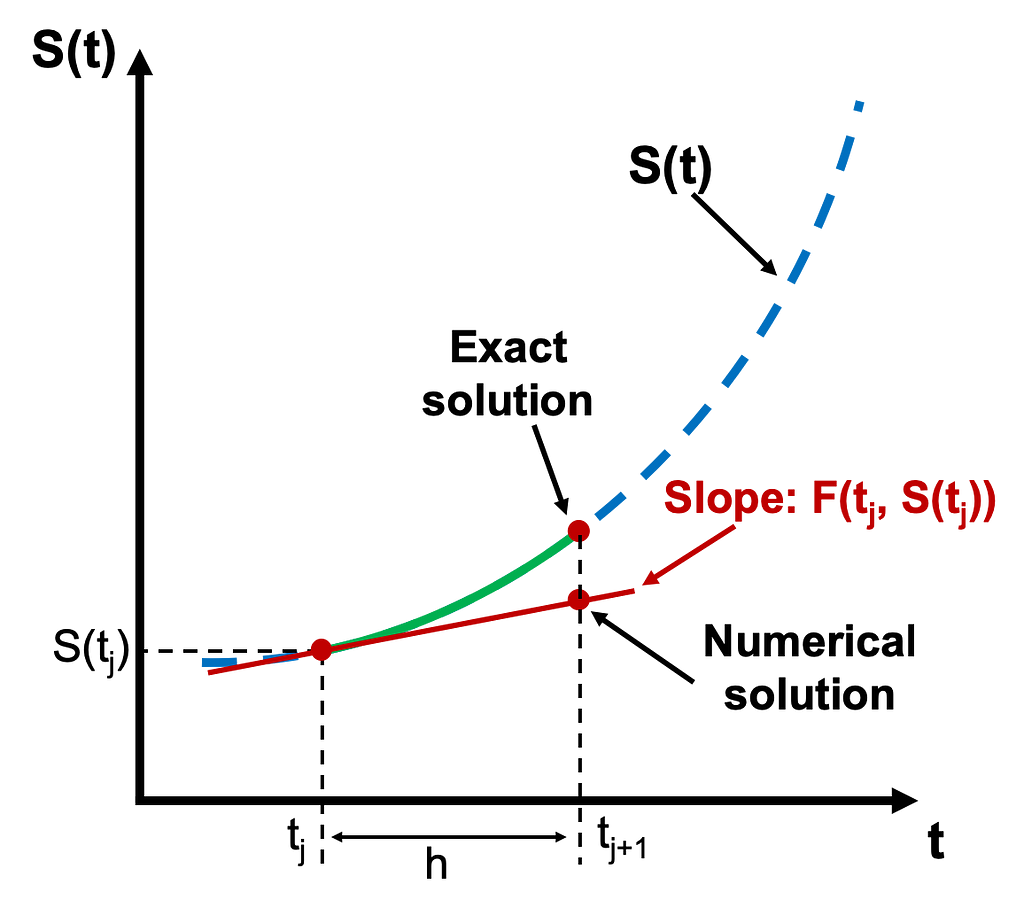
This numerical method of solving differential equations is ideal for use in game engines, as it’s simple, light, and aligns well with the concept of updating systems each frame (i.e., during the tick).
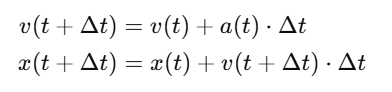
Assuming the delta time of the tick as our time step, the formulas become:
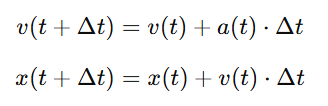
This is known as the explicit Euler method, applied to velocity and position. It’s called explicit because the new state — like position or velocity — is computed directly using only known values from the current step. There’s no need to solve complex equations or work backwards from unknowns.
Frame Rate and Simulation
One of the fundamental concepts in a game engine is the frame rate.
Frame rate (measured in FPS) defines how fast the scene is updated.
The higher the FPS, the smoother the visuals. A typical ideal frame rate is 60 FPS, meaning the scene updates 60 times per second, or once every 0.016 seconds (1/60).
Unreal can operate in two modes:
· Variable frame rate
· Fixed frame rate
In variable frame rate mode, the delta time between frames varies depending on the system’s performance. This ensures the game runs in real time, regardless of hardware capabilities.
In fixed frame rate mode, Unreal tries to maintain a constant delta time. If the hardware can keep up, the simulation remains real time — 1 second simulated equals 1 second real time.
However, if the system can’t maintain the target frame rate, Unreal will still simulate using the fixed delta time, even if more time has passed.
As a result, the simulation slows down, since less simulated time is processed per real time second — breaking real-time behavior.
The frame rate setting can be found in the “Project Settings” under “Engine” → “General Settings”.

Explicit Euler Integration in Action
Let’s build an actor that moves its mesh using explicit Euler integration.
We’ll perform calculations inside the tick function, linking the Euler step size to the delta time passed as a parameter.
UCLASS()
class PHYSICSPLAYGROUND_API AExplicitEulerTick : public AActor
{
 GENERATED_BODY()

public:
 UPROPERTY(EditAnywhere)
 FVector Force;
 UPROPERTY(EditAnywhere)
 float Mass;
 UPROPERTY(EditAnywhere)
 float TotalTime;
 UPROPERTY(VisibleAnywhere)
 float Accumulator;

 UPROPERTY(EditAnywhere)
 TObjectPtr<UStaticMeshComponent> StaticMesh;

public:
 AExplicitEulerTick();
 virtual void Tick(float DeltaTime) override;

protected:
 virtual void BeginPlay() override;

private:
 const float ToUnrealForceUnits = 100.0f;

 FVector StartLocation;
 FVector Position;
 FVector Velocity;

 bool Stop;
 int32 TickCount;
 double StartTime;
};
AExplicitEulerTick::AExplicitEulerTick()
{
 PrimaryActorTick.bCanEverTick = true;

 StaticMesh = CreateDefaultSubobject<UStaticMeshComponent>("StaticMesh");
 StaticMesh->SetupAttachment(RootComponent);
}

void AExplicitEulerTick::BeginPlay()
{
 Super::BeginPlay();

 StaticMesh->SetSimulatePhysics(false);

 TickCount = 0;
 Accumulator = 0.0f;
 Position = StartLocation = GetActorLocation();
 Velocity = FVector::ZeroVector;
 Stop = false;
 StartTime = FPlatformTime::Seconds();
}

void AExplicitEulerTick::Tick(float DeltaTime)
{
 Super::Tick(DeltaTime);

 const FVector Acceleration = (Force * ToUnrealForceUnits) / FMath::Max(Mass, KINDA_SMALL_NUMBER);

 if (Accumulator < TotalTime)
 {
  Position += Velocity * DeltaTime;
  Velocity += Acceleration * DeltaTime;

  TickCount++;
  Accumulator += DeltaTime;
 }
 else
 {
  if (!Stop)
  {
   double ElapsedTime = FPlatformTime::Seconds() - StartTime;

   UE_LOG(LogTemp, Type::Display, TEXT("Explicit Euler -- TickCount = %d\tAccumulator = %f\tPosition = (%f, %f, %f)\tVelocity = (%f, %f, %f)"),
    TickCount, Accumulator, Position.X, Position.Y, Position.Z, Velocity.X, Velocity.Y, Velocity.Z);

   UE_LOG(LogTemp, Type::Display, TEXT("Explicit Euler -- Elapsed Unreal Time = %f\t"), GetWorld()->GetTimeSeconds());
   UE_LOG(LogTemp, Type::Display, TEXT("Explicit Euler -- Elapsed Real Time = %f\t"), ElapsedTime);

   Stop = true;
  }
 }

 SetActorLocation(Position);
}
Set the object’s mass to 1 kg, place it at the origin (0, 0, 0), and apply a constant force of 10 N.
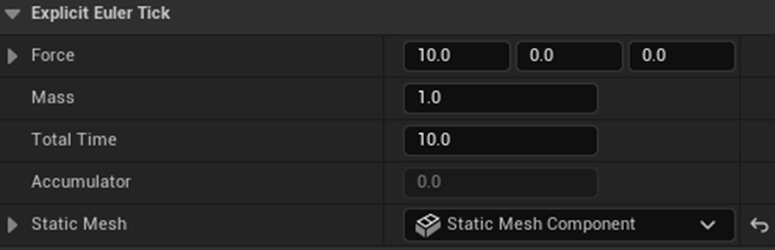
For the first simulation, we’ll use a fixed frame rate of 15 FPS.

After running the simulation, we observe that after 10.06 seconds (slightly more than 10, due to an extra iteration right after the limit), the cube has traveled 503.33 meters.
Using the classic equation for uniformly accelerated motion we can calculate how it should have traveled:
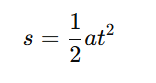

The simulation result is slightly underestimated.
The error is:

Can we do better?
Yes — the smaller the time step, the more accurate Euler’s approximation becomes.
Let’s try again with a fixed frame rate of 150 FPS.
Now, after 10.00 seconds, the cube travels 499.66 meters.
Again, using the classic equation for uniformly accelerated motion we can calculate how it should have traveled, and how large the error is:


It should have traveled 500.01 meters, resulting in a 0.06% error — much smaller!
Even though my system never actually reached 150 FPS (it stabilized around 90 FPS), the result remains correct, despite the simulation taking about 16 seconds instead of 10.
Why? Because Unreal still uses the fixed delta time for calculations.
This behavior is called deterministic, meaning you’ll get the same result on any hardware, as long as the input and delta time are the same.
Spring-Damper System and Oscillations
Now let’s explore a more complex scenario: a spring-damper system.
Here, a mass is attached to a spring.
When the spring is stretched and released, it begins to oscillate (harmonic motion), and is gradually slowed down by a damping force that resists its movement.
Acceleration is no longer constant — it changes both in magnitude and direction.
This system is modeled using Hooke’s law with damping:
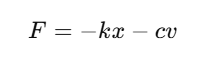
· k is the spring constant
· x is the displacement from rest
· c is the damping coefficient (higher = more resistance)
· v is the velocity of the mass
We build an actor using the same explicit Euler integration, calculating motion in the tick method.
UCLASS()
class PHYSICSPLAYGROUND_API AHarmonicExplicitEulerTick : public AActor
{
 GENERATED_BODY()

public:
 UPROPERTY(EditAnywhere)
 float Mass;
 UPROPERTY(EditAnywhere)
 float K;
 UPROPERTY(EditAnywhere)
 float Damper;

 UPROPERTY(EditAnywhere)
 TObjectPtr<UStaticMeshComponent> StaticMesh;

public:
 AHarmonicExplicitEulerTick();
 virtual void Tick(float DeltaTime) override;

protected:
 virtual void BeginPlay() override;

private:
 FVector StartLocation;
 FVector Position;
 FVector Velocity;

 int32 TickCount;
};
AHarmonicExplicitEulerTick::AHarmonicExplicitEulerTick()
{
 PrimaryActorTick.bCanEverTick = true;

 StaticMesh = CreateDefaultSubobject<UStaticMeshComponent>("StaticMesh");
 StaticMesh->SetupAttachment(RootComponent);
}

void AHarmonicExplicitEulerTick::BeginPlay()
{
 Super::BeginPlay();

 StaticMesh->SetSimulatePhysics(false);

 TickCount = 0;
 StartLocation = FVector(0, GetActorLocation().Y, GetActorLocation().Z);
 Position = GetActorLocation();
 Velocity = FVector::ZeroVector;
}

void AHarmonicExplicitEulerTick::Tick(float DeltaTime)
{
 Super::Tick(DeltaTime);

 TickCount++;

 const FVector DistanceFromStart = GetActorLocation() - StartLocation;
 const FVector Force = -DistanceFromStart * K - Velocity * Damper;
 const FVector Acceleration = Force / FMath::Max(Mass, KINDA_SMALL_NUMBER);

 Position += Velocity * DeltaTime;
 Velocity += Acceleration * DeltaTime;

 SetActorLocation(Position);
}
Let’s set a fixed frame rate of 90 FPS.
Immediately, we see something odd — the mass does not decelerate or settle.
At 30 FPS, things get worse: the system doesn’t stabilize but instead amplifies the oscillations infinitely.

This demonstrates that the explicit Euler method not only requires a very small time step to work correctly, but it also gives inaccurate results when the acceleration is not constant.
We need something better…
Enter Semi-Implicit Euler
In our current method, the new position is calculated using the previous velocity.
In systems with high acceleration, this causes delays in position updates.
Let’s modify our integration step:
This is called semi-implicit Euler.
It updates the position using the newly computed velocity, not the old one.
Semi-implicit Euler comes from the study of Hamiltonian systems, where total energy is conserved (e.g., an ideal spring).
Explicit Euler doesn’t preserve energy — it often adds energy, causing simulations to “explode”.
Semi-implicit Euler doesn’t exactly conserve energy, but it oscillates around the correct value, maintaining long-term stability. This property is called symplectic stability.
Let’s apply this small change to our code and compare results.
AHarmonicSemiImplicitEulerTick::AHarmonicSemiImplicitEulerTick()
{
 PrimaryActorTick.bCanEverTick = true;

 StaticMesh = CreateDefaultSubobject<UStaticMeshComponent>("StaticMesh");
 StaticMesh->SetupAttachment(RootComponent);
}

void AHarmonicSemiImplicitEulerTick::BeginPlay()
{
 Super::BeginPlay();

 StaticMesh->SetSimulatePhysics(false);

 TickCount = 0;
 StartLocation = FVector(0, GetActorLocation().Y, GetActorLocation().Z);
 Position = GetActorLocation();
 Velocity = FVector::ZeroVector;
}

void AHarmonicSemiImplicitEulerTick::Tick(float DeltaTime)
{
 Super::Tick(DeltaTime);

 TickCount++;

 const FVector DistanceFromStart = GetActorLocation() - StartLocation;
 const FVector Force = -DistanceFromStart * K - Velocity * Damper;
 const FVector Acceleration = Force / FMath::Max(Mass, KINDA_SMALL_NUMBER);

 Velocity += Acceleration * DeltaTime;
 Position += Velocity * DeltaTime;

 SetActorLocation(Position);
}
Even at very low frame rates (15 FPS), the system now converges to its rest position!
Let’s also compare the two integrators in the previous uniformly accelerated motion simulation.
We notice that the semi-implicit method slightly overestimates the result compared to the explicit one, while still maintaining the same level of accuracy even at low frame rates.
Unreal’s Built-In Integrator
Modern game engines — Unreal included — use an integrator very similar to semi-implicit Euler.
To verify this, we build an actor that moves its mesh using Unreal’s built-in physics.
We only apply the AddForce in the tick function, and let Unreal handle the rest.
UCLASS()
class PHYSICSPLAYGROUND_API AUnrealSolver : public AActor
{
 GENERATED_BODY()

public:
 UPROPERTY(EditAnywhere)
 FVector Force;
 UPROPERTY(EditAnywhere)
 float Mass;
 UPROPERTY(EditAnywhere)
 float TotalTime;
 UPROPERTY(VisibleAnywhere)
 float Accumulator;

 UPROPERTY(EditAnywhere)
 TObjectPtr<UStaticMeshComponent> StaticMesh;

public:
 AUnrealSolver();
 virtual void Tick(float DeltaTime) override;

protected:
 virtual void BeginPlay() override;

private:
 const float ToUnrealForceUnits = 100.0f;

 FVector Position;
 FVector Velocity;

 int32 TickCount;
};
AUnrealSolver::AUnrealSolver()
{
 PrimaryActorTick.bCanEverTick = true;

 StaticMesh = CreateDefaultSubobject<UStaticMeshComponent>("StaticMesh");
 StaticMesh->SetupAttachment(RootComponent);
}

void AUnrealSolver::BeginPlay()
{
 Super::BeginPlay();

 TickCount = 0;
 Accumulator = 0.0f;
 StaticMesh->SetMassOverrideInKg(NAME_None, Mass);
 StaticMesh->SetLinearDamping(0.0f);
 StaticMesh->SetAngularDamping(0.0f);
 StaticMesh->SetSimulatePhysics(true);
}

void AUnrealSolver::Tick(float DeltaTime)
{
 Super::Tick(DeltaTime);

 if (StaticMesh->IsSimulatingPhysics())
 {
  Position = GetActorLocation();
  Velocity = StaticMesh->GetComponentVelocity();

  if (Accumulator < TotalTime)
  {
   StaticMesh->AddForce(Force * ToUnrealForceUnits);

   TickCount++;
   Accumulator += DeltaTime;
  }
  else
  {
   UE_LOG(LogTemp, Type::Display, TEXT("Unreal Solver -- TickCount = %d\tPosition = (%f, %f, %f)\tVelocity = (%f, %f, %f)"),
    TickCount, Position.X, Position.Y, Position.Z, Velocity.X, Velocity.Y, Velocity.Z);

   StaticMesh->SetSimulatePhysics(false);
  }
 }
}
Comparing this to our two custom integrators, the results — at both low (30 FPS) and high (100 FPS) frame rates — match the semi-implicit method.
To summarize, semi-implicit Euler is the best trade-off between precision, performance and stability, and is one of the most widely used methods in commercial game engines.
Substepping and Precision
Historically, in Unreal Engine, the physics step was tightly coupled to the main game tick.
This meant physics updates happened once per frame, using the game tick’s delta time — reducing precision if the frame rate dropped.
To fix this, Unreal introduced substepping.
With substepping, Unreal internally splits the tick’s delta time into smaller steps, and updates physics at each substep.
This makes it possible to lower the game frame rate without losing physics accuracy, while still keeping physics and gameplay logic in sync.
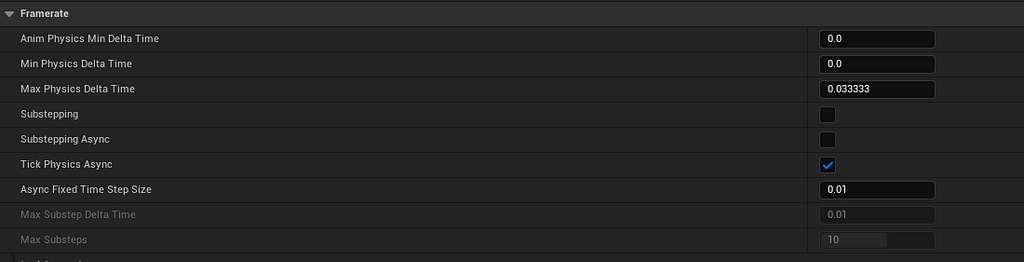
Substepping settings can be found in the “Project Settings” under “Engine” → “Physics”.
To enable it:
· Check “Substepping”
· Set “Max Substep Delta Time” (max duration for each substep)
· Set “Max Substeps” (max iterations per frame)
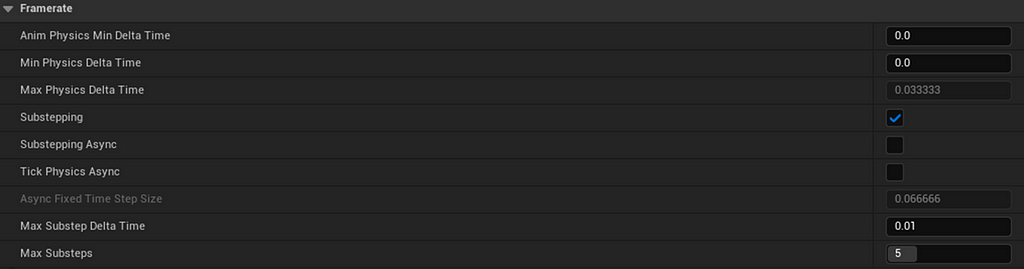
For example, with these parameters: if the tick delta time exceeds 10ms (as the frame rate drops below 100 FPS), Unreal splits the physics frame into smaller substeps.
If even the max substeps aren’t enough, Unreal will stretch the substep duration — reducing precision.
We can simulate this ourselves.
Let’s build an actor affected by gravity, using semi-implicit integration and a custom substepping loop inside tick.
Our substepping logic approximates Unreal’s, though the real implementation is more advanced.
UCLASS()
class PHYSICSPLAYGROUND_API ASubstepBouncingBall : public AActor
{
 GENERATED_BODY()

public:
 UPROPERTY(EditAnywhere)
 float Mass;
 UPROPERTY(EditAnywhere)
 float Gravity;
 UPROPERTY(EditAnywhere)
 float Restitution;
 UPROPERTY(EditAnywhere)
 float GroundHeight = 0.0f;

 UPROPERTY(EditAnywhere)
 bool Substepping;
 UPROPERTY(EditAnywhere, meta = (EditCondition = "Substepping"))
 float MaxDt;
 UPROPERTY(EditAnywhere, meta = (EditCondition = "Substepping"))
 float MaxSubsteps;

 UPROPERTY(EditAnywhere)
 TObjectPtr<UStaticMeshComponent> StaticMesh;

public:
 ASubstepBouncingBall();
 virtual void Tick(float DeltaTime) override;

protected:
 virtual void BeginPlay() override;

private:
 const float ToUnrealForceUnits = 100.0f;

 FVector Position;
 FVector Velocity;

 int32 PhysicsTickCount;

private:
 void PhysicsComputation(float Dt);
};
ASubstepBouncingBall::ASubstepBouncingBall()
{
 PrimaryActorTick.bCanEverTick = true;

 StaticMesh = CreateDefaultSubobject<UStaticMeshComponent>("StaticMesh");
 StaticMesh->SetupAttachment(RootComponent);
}

void ASubstepBouncingBall::BeginPlay()
{
 Super::BeginPlay();

 StaticMesh->SetSimulatePhysics(false);

 PhysicsTickCount = 0;

 Position = GetActorLocation();
 Velocity = FVector::ZeroVector;
}

void ASubstepBouncingBall::Tick(float DeltaTime)
{
 Super::Tick(DeltaTime);

 if (Substepping)
 {
  int32 SubstepsCount = FMath::CeilToInt32(DeltaTime / MaxDt);
  if (SubstepsCount > MaxSubsteps)
   SubstepsCount = MaxSubsteps;

  float SubstepTime = DeltaTime / SubstepsCount;
  if (SubstepTime > MaxDt)
   SubstepTime = MaxDt;

  for (int32 i = 0; i < SubstepsCount; ++i)
  {
   PhysicsComputation(SubstepTime);
  }
 }
 else
 {
  PhysicsComputation(DeltaTime);
 }

 SetActorLocation(Position);
}

void ASubstepBouncingBall::PhysicsComputation(float Dt)
{
 PhysicsTickCount++;

 Velocity.Z += Gravity * Dt;
 Position += Velocity * Dt;

 if (Position.Z <= GroundHeight)
 {
  Position.Z = GroundHeight;
  Velocity.Z *= -Restitution;

  if (FMath::Abs(Velocity.Z) < 10.0f)
  {
   Velocity.Z = 0.0f;
  }
 }
}
If we simulate at a problematic 15 FPS, the ball using substeps of 0.01 continues to bounce correctly, while the non-substepped one loses accuracy.
This technique lets us decouple physics frequency from game tick rate, without drawbacks.
Chaos and Async Physics Tick
Starting with Unreal Engine 5.0, PhysX is no longer the default physics engine.
Instead, Epic introduced Chaos, its own in-house physics system.
One major improvement is the ability to run physics on a separate thread, using the Async Physics Tick.
The physics simulation now runs in a parallel physics thread, which:
· Can guarantee a fixed time step with constant delta time
· Can run at a different frequency from the game tick
· Communicates with the game thread through synchronized buffers
This means that the game and physics threads are no longer updated in real-time sync.
This setup may sound familiar to Unity developers, since Unity has always used a fixed-step physics system, separating game logic (in Update() method) from physics logic (in FixedUpdate() method).
Now, let’s verify whether the physical state information of a body instance, when read from the game tick, actually differs from the one computed on the physics thread.
To do this, we’ll use the Async Tick Physics plugin, available for free on GitHub (https://github.com/Mr-Craig/AsyncTickPhysics).
This plugin greatly simplifies interacting with the physics thread in Blueprints.
Using it is quite straightforward:
· Enable the plugin
· Activate “Tick Physics Async” from Unreal’s “Physics Settings”
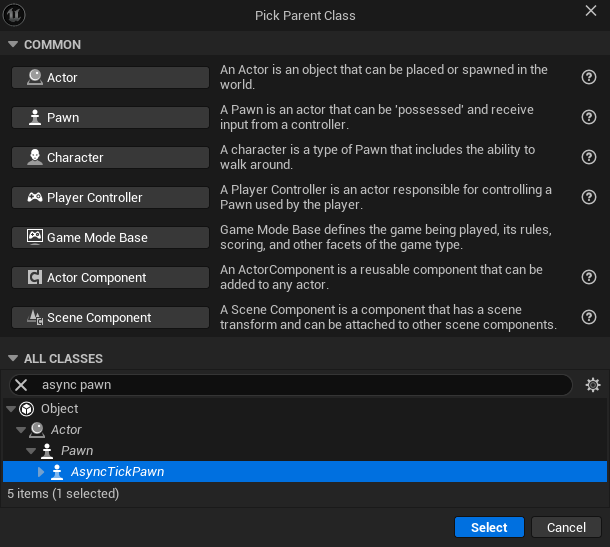
· Create a new Blueprint and derive your Pawn from the AsyncTickPawn class
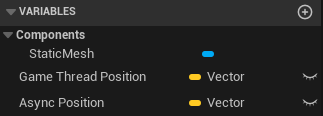
· Create two variables to store position vectors — this is essential because we cannot access non-thread-safe operations (like printing to the screen or log) directly from the physics thread. We’ll instead store the values and print them later in the main tick function, when it’s safe to do so
· In the AsyncTick event, use the plugin to retrieve the transform of the physical object
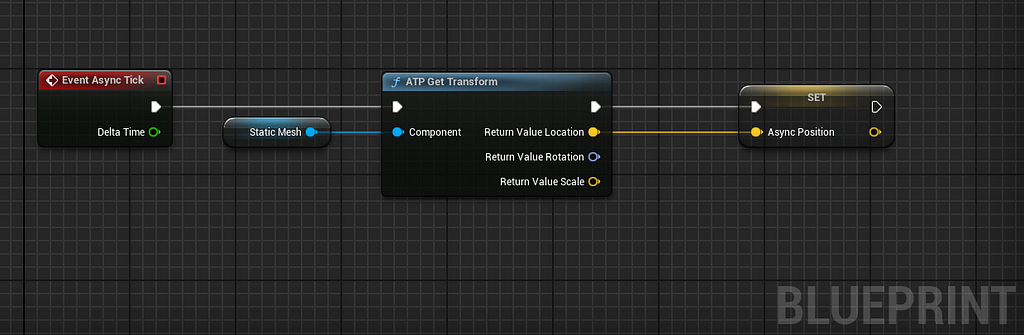
· In the regular tick function, retrieve the transform using the classic GetWorldLocation node and compare the two vectors, printing the results
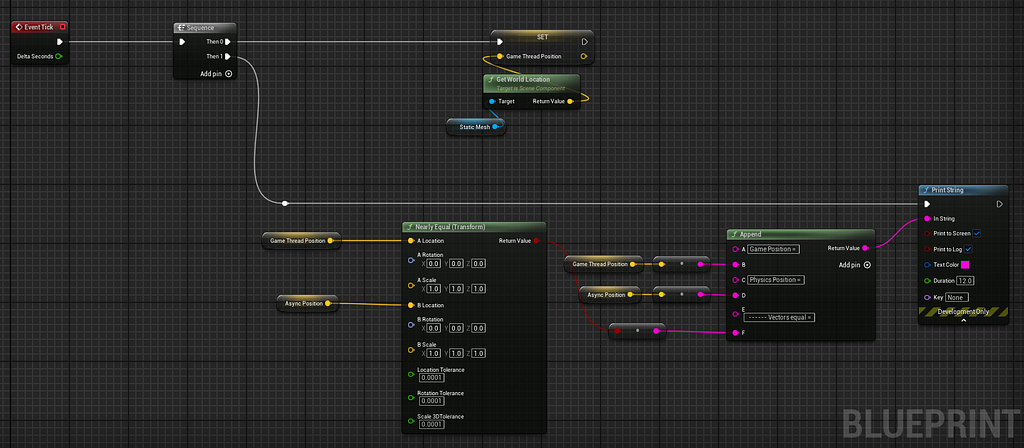
Running the simulation reveals a significant difference between the transform read from the physics thread and the one retrieved during the game tick.
This demonstrates that when Async Physics is enabled, developers need to be careful about how they read or apply physical state values.
Readings from the game thread (such as GetActorLocation or GetComponentTransform) may be interpolated or outdated compared to the actual physical state.
Conclusion
In this video, we explored Unreal Engine’s physics system — from numerical integration and substepping, to the new asynchronous physics tick. Understanding these mechanisms is essential for building stable and performant simulations.
Thanks for reading!
If you found it helpful, don’t forget to like, subscribe, and leave a comment with your thoughts or questions.
Tick by Tick: How Unreal Engine Simulates Real-World Physics was originally published in Level Up Coding on Medium, where people are continuing the conversation by highlighting and responding to this story.
This content originally appeared on Level Up Coding – Medium and was authored by Federico Grenoville