This content originally appeared on Telerik Blogs and was authored by Héctor Pérez
In this post, we will explore the different types of alerts available in the .NET MAUI Community Toolkit.
The .NET MAUI Community Toolkit alerts are an excellent option for displaying information to users about the successful completion of a task or its current state, as well as errors or warnings that may need their attention without disrupting the application flow like a DisplayAlert does.
Creating a Project to Implement Alerts with the .NET MAUI Community Toolkit
To demonstrate the use of alerts in a .NET MAUI application, we will create a sample project to implement them. To do this, you must create a new project using the .NET MAUI App template, and be sure not to include the example content in the Additional Information window.
Next, we will install the following NuGet packages:
- Telerik Controls for .NET MAUI (follow the installation guide)
- CommunityToolkit.Maui
Once this is done, you need to initialize both libraries from the MauiProgram.cs file by adding the following lines:
public static class MauiProgram
{
    public static MauiApp CreateMauiApp()
    {
        var builder = MauiApp.CreateBuilder();
        builder
            .UseMauiApp<App>()
            .UseMauiCommunityToolkit()
            .UseTelerik()
            ...

        return builder.Build();
    }
}
After initializing the libraries, proceed to modify the MainPage.xaml file as follows:
- Add a new namespace with a reference to the Progress Telerik UI for .NET MAUI controls (I have called it
telerik), as well as a reference to the namespace of the ContentPage you are modifying (in my example, it is calledlocal), as in the following example:
<ContentPage
    x:Class="AlertsDemo.MainPage"
    xmlns="http://schemas.microsoft.com/dotnet/2021/maui"
    xmlns:x="http://schemas.microsoft.com/winfx/2009/xaml"
    xmlns:local="clr-namespace:AlertsDemo"
    xmlns:telerik="clr-namespace:Telerik.Maui.Controls;assembly=Telerik.Maui.Controls"
    Title="Todo List App">
    ...
- Next, we will create the graphical interface of the application using the following controls:
- RadEntry: A control for the user to enter a new task
- RadButton: To start the process of adding the task to the task list
- RadCollectionView: To display previously added tasks
The code would look like this:
<ContentPage...>

    <VerticalStackLayout Padding="20" Spacing="20">
        <telerik:RadEntry x:Name="taskEntry" Placeholder="Enter a task..." />
        <telerik:RadButton Clicked="OnAddTaskClicked" Text="Add Task" />
        <telerik:RadCollectionView
            x:Name="taskCollectionView"
            HeightRequest="300"
            ItemsSource="{x:Static local:MainPage.Tasks}"
            SelectionMode="None">
            <telerik:RadCollectionView.ItemTemplate>
                <DataTemplate>
                    <Label FontSize="16" Text="{Binding}" />
                </DataTemplate>
            </telerik:RadCollectionView.ItemTemplate>
        </telerik:RadCollectionView>
    </VerticalStackLayout>

</ContentPage>
On the other hand, the code-behind file—in my example MainPage.xaml.cs—would initially look like this:
using CommunityToolkit.Maui.Core;
using System.Collections.ObjectModel;
using System.Threading;

namespace AlertsDemo
{
    public partial class MainPage : ContentPage
    {
        public static ObservableCollection<string> Tasks { get; } = new ObservableCollection<string>();

        public MainPage()
        {
            InitializeComponent();
        }

        private async void OnAddTaskClicked(object sender, EventArgs e)
        {
            string task = taskEntry.Text?.Trim();

            if (!string.IsNullOrEmpty(task))
            {
                Tasks.Add(task);
                taskEntry.Text = string.Empty;
            }
            else
            {
            }
        }
    }
}
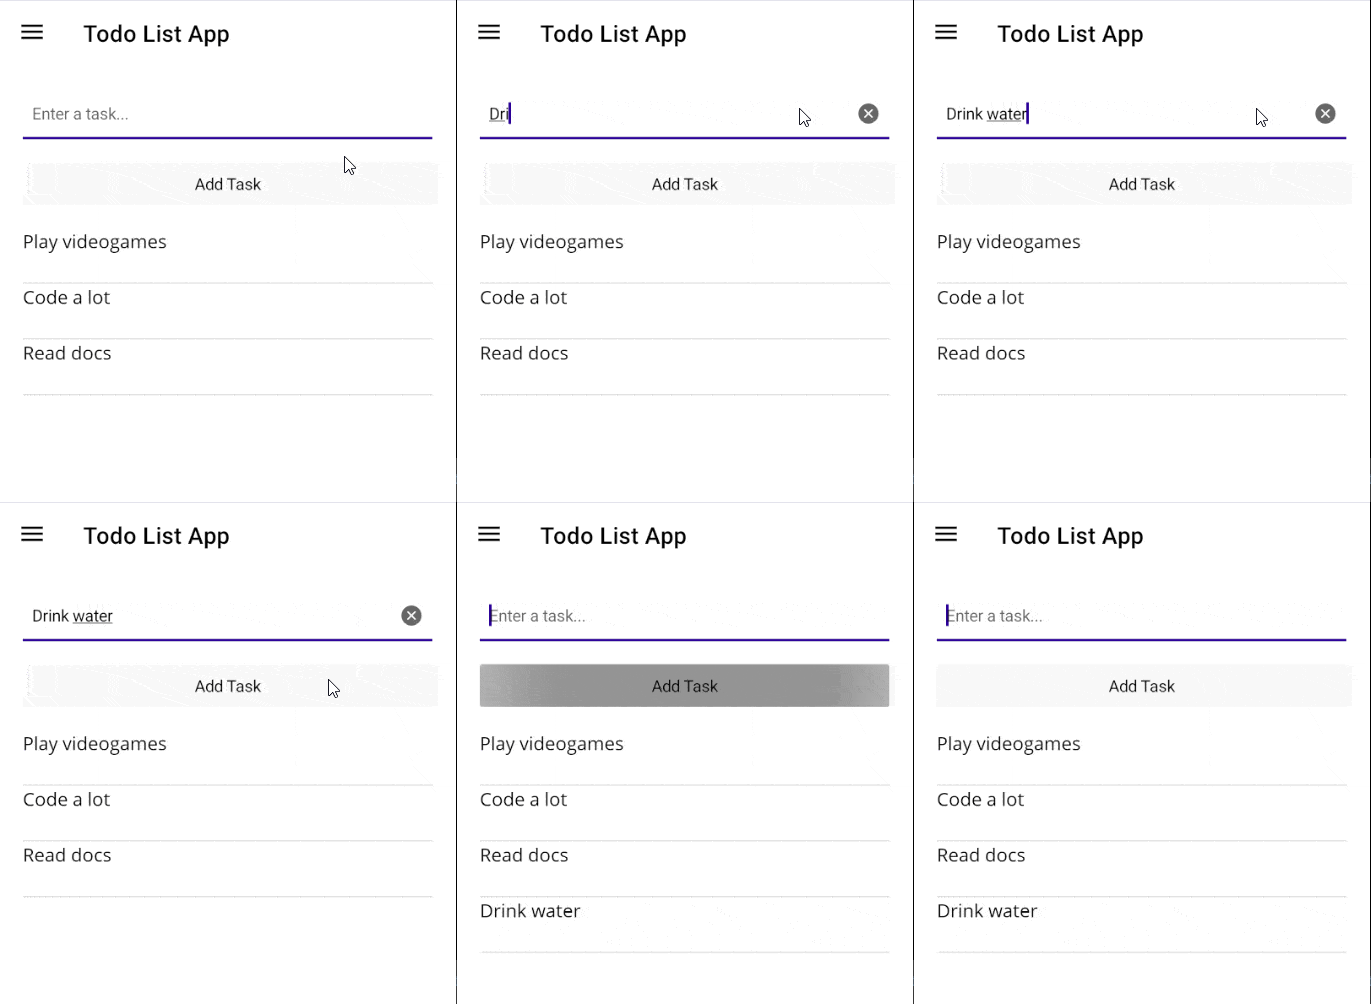
If we run the application with the previous modifications, you will see a result like the following:

In the above image, I have added some tasks to the list. However, you can see that there are no notifications to know that the task was added successfully, nor to warn the user that they forgot to enter the task text before pressing the Add Task button. Let’s implement these notifications using the .NET MAUI Community Toolkit alerts.
Creating Snackbars with the .NET MAUI Toolkit
The first type of alert we will review is the Snackbar, which is a type of alert that appears by default at the bottom of the screen for the duration we define. Note that to use this alert on Android and iOS, no additional modifications are required. However, for Windows, you must first configure the MauiProgram.cs file to enable Snackbars on Windows, as shown below:
public static class MauiProgram
{
    public static MauiApp CreateMauiApp()
    {
        var builder = MauiApp.CreateBuilder();
        builder
            .UseMauiApp<App>()
            .UseMauiCommunityToolkit(options =>
            {
                options.SetShouldEnableSnackbarOnWindows(true);
            })
            ...
    }
}
Then, modify the file located in Your Project | Platforms | Windows | Package.appmanifest by opening it with the XML (Text) Editor to add the following namespaces:
<Package
  ...
  xmlns:com="http://schemas.microsoft.com/appx/manifest/com/windows10"
  xmlns:desktop="http://schemas.microsoft.com/appx/manifest/desktop/windows10">
Within this same tag, locate the IgnorableNamespaces attribute and update it as follows:
IgnorableNamespaces="uap rescap com desktop"
Finally, within each Applications tag, add an Extensions section as shown below:
<Applications>
    <Application Id="App" Executable="$targetnametoken$.exe" EntryPoint="$targetentrypoint$">
        <uap:VisualElements
            ... />
        </uap:VisualElements>

        <Extensions>
            <!-- Specify which CLSID to activate when notification is clicked -->
            <desktop:Extension Category="windows.toastNotificationActivation">
                <desktop:ToastNotificationActivation ToastActivatorCLSID="6e919706-2634-4d97-a93c-2213b2acc334" />
            </desktop:Extension>

            <!-- Register COM CLSID -->
            <com:Extension Category="windows.comServer">
                <com:ComServer>
                    <com:ExeServer Executable="YOUR-PATH-TO-EXECUTABLE" DisplayName="$targetnametoken$" Arguments="----AppNotificationActivated:">
                        <!-- Example path to executable: CommunityToolkit.Maui.Sample\CommunityToolkit.Maui.Sample.exe -->
                        <com:Class Id="6e919706-2634-4d97-a93c-2213b2acc334" />
                    </com:ExeServer>
                </com:ComServer>
            </com:Extension>
        </Extensions>

    </Application>
</Applications>
In the above code, replace YOUR-PATH-TO-EXECUTABLE with a valid path. In my case, the path is AlertsDemo\AlertsDemo.exe.
Having configured the Windows project, let’s see how to display Snackbars.
Displaying a Snackbar
To display a Snackbar, you need to do so from C# code. The properties you can configure for a Snackbar are as follows:
- Text (string): The text to display to the user (Required)
- Action (Action): An action to be executed when the Snackbar button is clicked
- ActionButtonText (string): The text displayed on the Snackbar button
- Anchor (IView): If an anchor is specified, the Snackbar will appear near the specified view. Otherwise, it will appear at the bottom of the screen
- Duration (TimeSpan): The duration of the Snackbar on the screen
- VisualOptions (SnackbarOptions): Visual options for the Snackbar
Based on the above properties, at the end of the OnAddTaskClicked event handler, you can create a Snackbar object as follows:
CancellationTokenSource cancellationTokenSource = new CancellationTokenSource();
if (!string.IsNullOrEmpty(task))
{
    Tasks.Add(task);
    taskEntry.Text = string.Empty;

    var snackbar = new Snackbar()
    {
        Text = "Task added",
        ActionButtonText = "Undo",
        Action = async () =>
        {
            Tasks.Remove(task);
        },
        Duration = TimeSpan.FromSeconds(5),
        Anchor = taskEntry
    };
}
In the above code, we have defined an action to undo the addition of the task through the Action property. We have also specified that the Snackbar will remain for 5 seconds and will appear near the TaskEntry control. Finally, we must call the Show method to display the Snackbar as follows:
await snackbar.Show(cancellationTokenSource.Token);
When you run the application, the Snackbar will appear when adding a new task near the specified View, allowing the task addition to be undone:

Simplifying Snackbar Creation
The Snackbar class has a Make method that allows passing a series of parameters to avoid creating an instance of the Snackbar type, enabling faster display of Snackbars. In our example code, we want to show a message when the user forgets to enter a task before pressing the Add Task button. This can be done using the Make method as follows:
else
{
    var snackbar = Snackbar.Make("Please enter a task",
        duration: TimeSpan.FromSeconds(2),
        anchor: taskEntry);
    await snackbar.Show(cancellationTokenSource.Token);
}
The above code demonstrates how we have avoided creating the Snackbar instance, allowing faster display of Snackbars.
Customizing the Snackbar
You should know that Snackbars can also be customized using an instance of the SnackbarOptions type, which has the following properties:
- CharacterSpacing (double): To specify character spacing
- Font (Font): To modify the Snackbar message font
- TextColor (Color): To change the Snackbar text color
- ActionButtonFont (Font): To modify the Snackbar button font
- ActionButtonTextColor (Color): To specify the Snackbar button text color
- BackgroundColor (Color): To assign the Snackbar background color
- CornerRadius (CornerRadius): To modify the Snackbar rounding
An example of defining SnackbarOptions and assigning it to a Snackbar can be seen below:
else
{
    var snackbarOptions = new SnackbarOptions
    {
        BackgroundColor = Colors.DarkGreen,
        TextColor = Colors.White,
        ActionButtonTextColor = Colors.Yellow,
        CornerRadius = new CornerRadius(4),
        Font = Microsoft.Maui.Font.SystemFontOfSize(14),
        ActionButtonFont = Microsoft.Maui.Font.SystemFontOfSize(14),
        CharacterSpacing = 0.5
    };
    var snackbar = Snackbar.Make("Please enter a task",
        duration: TimeSpan.FromSeconds(2),
        anchor: taskEntry,
        visualOptions: snackbarOptions);
    await snackbar.Show(cancellationTokenSource.Token);
}
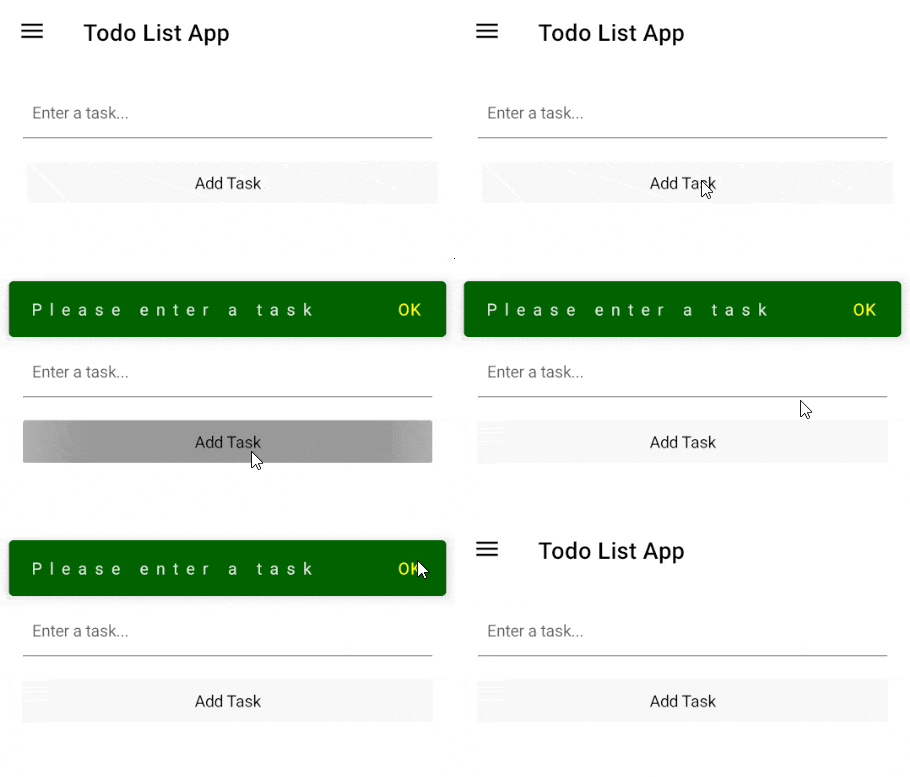
When running the application with the changes assigned to the Snackbar, you will see the following:

Let’s now look at some other useful methods and events available in the Snackbar.
Other Snackbar Methods and Events
Previously, you have seen the use of the Show method to display the Snackbar. If you call the Show method while a Snackbar is already on the screen, it will be dismissed to show the new Snackbar. Similarly, if you want to dismiss a Snackbar through code, you can do so using the Dismiss method.
Finally, it is important to know that you can subscribe to the Shown and Dismiss events, the first to perform an action when the Snackbar is shown, and the second to perform an action when the Snackbar is dismissed.
Creating Toasts with the .NET MAUI Toolkit
The second type of alert you can use thanks to the .NET MAUI Community Toolkit is the Toast alert. This is an alert that appears at the bottom of the screen but, unlike a Snackbar, disappears automatically after the specified time. Another characteristic of Toasts is that they do not have customization properties like Snackbars, so the design will always be the same.
The properties of a Toast are as follows:
- Text (string): Defines the text displayed in the Toast
- Duration (
ToastDuration): Specifies the time the Toast will be on screen, with possible valuesToastDuration.Shortfor 2 seconds andToastDuration.Longfor 3.5 seconds - TextSize (double): Sets the font size
As with a Snackbar, it is possible to create an instance of the Toast class or use the Make method to create it, as demonstrated in the following code snippet:
if (!string.IsNullOrEmpty(task))
{
    Tasks.Add(task);
    taskEntry.Text = string.Empty;

    string text = "Task added";
    ToastDuration duration = ToastDuration.Short;
    double fontSize = 16;

    var toast = Toast.Make(text, duration, fontSize);

    await toast.Show(cancellationTokenSource.Token);
}
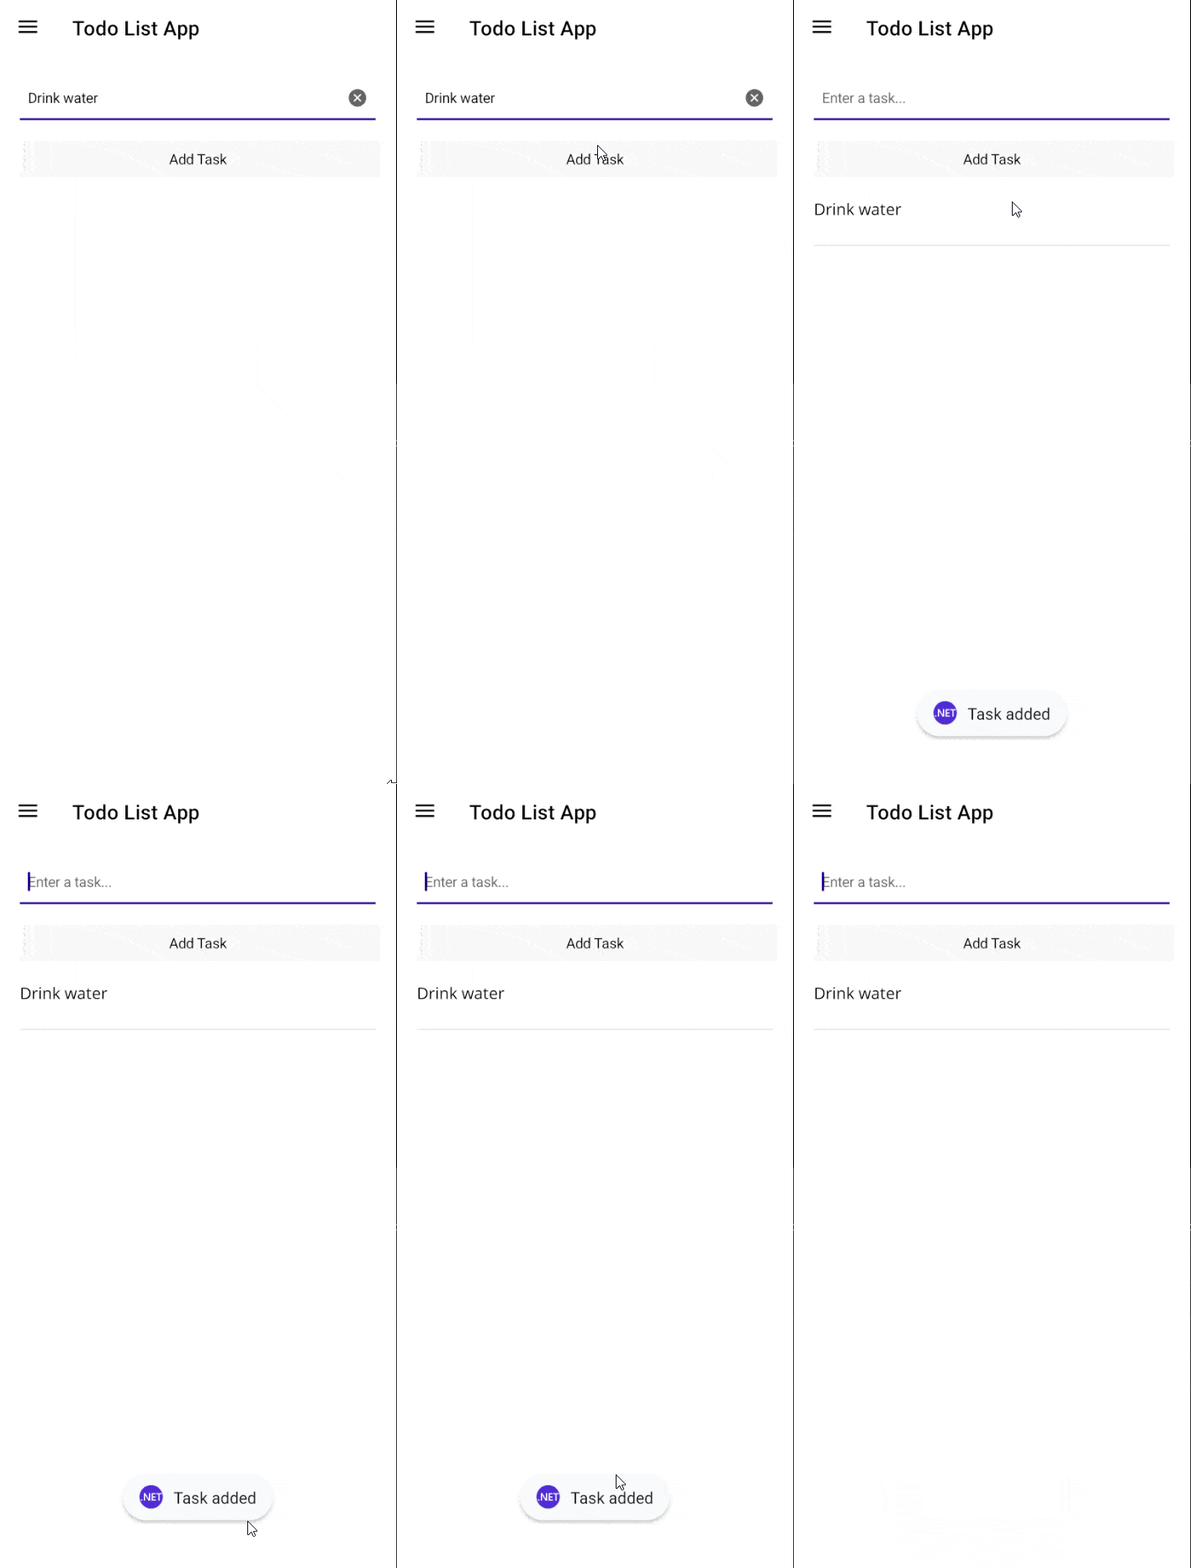
When running the application with the above code, you get the following:

Finally, it is possible to use the Dismiss method to hide the Toast if you need to do so through code.
Conclusion
Through this article, you have learned about the types of alerts available in the .NET MAUI Community Toolkit, which allow you to notify users that something is happening without interrupting the application flow. It’s time to set aside DisplayAlerts and switch to Snackbars or Toasts.
This content originally appeared on Telerik Blogs and was authored by Héctor Pérez