This content originally appeared on Level Up Coding – Medium and was authored by Itsuki
Shader Functions From Scratch! Modifier Basics! Combinations! Animations!

****************
First of all, Let me make this clear!
I am a beginner to Metal!
So!
If you are looking for useful tips/advices from experts, or just want a collection of cool shaders, I am sorry but this article is probably not the right place for you!
However!
Because I am a beginner, I can share with you my process of thinking, my take, my approach on this thing from level 0, and hopefully can act as a little hint for you to understand Metal!
****************
In this article, we will be checking out how we can use metal shaders to apply filter effects on views using the colorEffect(_:isEnabled:), distortionEffect(_:maxSampleOffset:isEnabled:), and layerEffect(_:maxSampleOffset:isEnabled:) modifiers.
Basics! Combinations! Couple different ways to Animate!
If you are like me, always wanting to add some Metal to your SwiftUI app, but thinking that creating and managing those queues or pipelines is just too overwhelming, these modifiers are a great place to start!
And of course, we will be diving a little bit into those metal shader functions!
What are those, What they mean, What each parameter represents!
You can also grab the demo code we have from my GitHub!
Let’s start!
Teeny Tiny Perquisite
Before we are able to do anything, let’s first make sure to we have Metal Toolchain installed under Xcode > Settings > Components!
It is required to compile the Metal source files!

Super Quick Introduction To Metal Shaders
First of all, A metal shader is a piece of code / program / function written in the Metal Shading Language (MSL) that runs on the GPU and determines how graphics are processed and displayed, ie: the color, the light levels, and etc.
There are a lot of function types provided, vertex, fragment, kernel, mesh, and etc. In this article, we will be focusing on stitchable, the function type required to use with the layer effect modifiers above.
A function with a [[stitchable]] attribute is just a function that can be used in the Metal Framework Function Stitching API and implies [[visible]].
Honestly, all of this does not matter that much!
It is just a general (super high level) overview on what shaders are!
What matters is how can we write those functions to make things work!
And that is what we will be doing next!
Diving into those stitchable to create our first shader to be used with colorEffect(_:isEnabled:)!
Color Effect
The colorEffect(_:isEnabled:) modifier returns a new view that applies shader to the view as a filter effect on the color of each pixel.
Shader Function
Let’s start with shader here!
Since this is our first one, let’s do it step by step!
Starting from creating a Metal File!
File > New > File From Template

Give it any name you like, it doesn’t really matter, and Choose Create!
Depending on the modifier we are using the shader function for, a different functions signature, ie: different returned parameter type and different arguments, is required.
To be able to use the shader as a color filter with the colorEffect(_:isEnabled:) modifier, here is the required function signature.
[[ stitchable ]] half4 name(float2 position, half4 color, args...)
What do we actually have here?
Obviously, the name is just the function name.
For arguments, we have
- float2 position: The pixel position in user-space coordinates, in the form (x, y), for example, float2(0, 0) for point (0, 0).
- half4 color: source color of the pixel as (r, g, b, a), for example, half4(0.0, 0.0, 0.0, 0.0) for black.
float is pretty obvious, but half is just a half precision float that can be converted from a float using half(someFloat) . The number coming after the type is the dimension.
These two arguments are the default/required arguments to the shader function we will be creating, and of course, we can add more custom ones based on our needs.
What do I meant by default? It actually just a SwiftUI thing and doesn’t matter from Shader points of view so let’s skip it for now!
Now, what are we returning?
As you might already be able to guess from the returning type, that same half4 as we had in the argument, so probably a color!
But what color?
Let’s recall what the colorEffect(_:isEnabled:) modifier does! It applies the shader to the view as a filter effect on the color of each pixel.
That is we are retuning the color we would like to render for the pixel with the given position.
Now that we get an idea of how this shader function should be constructed, let’s write one ourselves! A little modified version of the checkerboard provided by HACKING WITH SWIFT.
[[ stitchable ]] half4 checkerboard(float2 position, half4 currentColor, float checkSize, float opacity) {
    // A view will consist of a certain number of checkers in the x and y direction
    // posInChecks gives which checker will the given pixel belongs to.
    uint2 posInChecks = uint2(position.x / checkSize, position.y / checkSize);
    bool isOpaque = (posInChecks.x ^ posInChecks.y) & 1;
    return isOpaque ? currentColor * opacity : currentColor;
}
It should look something like following if we have applied it to a circle just to give you an idea of what the function does!

For the arguments, in addition to the required two, we also had
- float checkSize: the checker size assuming we want a square. If you want a different width and height, you can also use a float2 here or just provide the width and height as two separate arguments!
- float opacity: The alpha opacity value to apply to the pixel’s original color if it is a unchecked pixel!
For the function body, we first find out whether if this pixel should be opaque, ie: with alpha opacity applied, or not, based on the checker size we like. We then either return the currentColor as it is or return one with alpha channel modified based on isOpaque.
Most of the operators we have here should look pretty familiar, the multiplication (*), the division (/), the ternary selection (? & :), and the bitwise and (&). However, what is this ^? Obviously, it cannot be that power we are used to! You might be able to guess from the context and what the posInChecks represents, but it is the bitwise exclusive or.
Anyway!
Time to head back to our SwiftUI!
Apply Shader
We have already done the hard part!
Now, let’s sit back, be relax, and write some SwiftUI code!
- Create a Shader
- Apply the colorEffect(_:isEnabled:) modifier
A Shader is a reference to a function in a Metal shader library, along with its bound uniform argument values. There are couple ways to construct it.
Way One
First of all, with the init(function:arguments:) obviously.
let checkerSize: CGFloat = 10
let checkerOpacity: CGFloat = 0.1
let colorShader: Shader = Shader(
    function: ShaderFunction(library: .default, name: "checkerboard"),
    arguments: [.float(checkerSize), .float(checkerOpacity)]
)
To create a ShaderFunction, we have used this init(library: ShaderLibrary, name: String) initializer that creates a new function reference from the provided shader library and function name string.
We have used the default library here which gives us the shader library of the main app bundle. You can also create a shader library for specify a specific bundle using the bundle(_:) instead.
We then have our Argument List. Here is a list of possible argument values we can provide.
- boundingRect: Returns an argument value representing the bounding rect of the shape or view that the shader is attached to, as float4(x, y, width, height). This value is undefined for shaders that do not have a natural bounding rect (e.g. filter effects drawn into GraphicsContext).
- color(Color): Returns an argument value representing color. When passed to a MSL function it will convert to a half4 value, as a premultiplied color in the target color space.
- colorArray([Color]): Returns an argument value defined by the provided array of color values. When passed to an MSL function it will convert to a device const half4 *ptr, int count pair of parameters.
- data(Data): Returns an argument value defined by the provided data value. When passed to an MSL function it will convert to a device const void *ptr, int size_in_bytes pair of parameters.
- float<T>(T): Returns an argument value representing the MSL value float(x).
- float2(_:): Returns an argument value representing the MSL value float2(point.x, point.y).
- float2<T>(T, T): Returns an argument value representing the MSL value float2(x, y).
- float3<T>(T, T, T): Returns an argument value representing the MSL value float3(x, y, z).
- float4<T>(T, T, T, T): Returns an argument value representing the MSL value float4(x, y, z, w).
- floatArray([Float]): Returns an argument value defined by the provided array of floating point numbers. When passed to an MSL function it will convert to a device const float *ptr, int count pair of parameters.
- image(Image): Returns an argument value defined by the provided image. When passed to an MSL function it will convert to a texture2d<half> value. Currently only one image parameter is supported per Shader instance.
Also, note how we are only providing 2 arguments? The checkSize and the opacity. Recall what I have mentioned above, the float2 position, half4 currentColor are the default arguments. That is SwiftUI is responsible for passing those two arguments to our shader function!
Way 2
Now, if we take a look at ShaderLibrary , it actually has dynamicMemberLookup implemented, ie: subscript(dynamicMember:), that returns a ShaderFunction.
Also, this ShaderFunction is dynamicCallable by providing the argument list directly, dynamicallyCall(withArguments:).
Which means, we can re-write what we had above like following!
let colorShader: Shader = ShaderLibrary.checkerboard(
  .float(checkerSize), .float(checkerOpacity)
)
Honestly speaking, you might think the second approach look elegant, but I personally prefer the first one!
It is just easier to read and easier to understand!
At least to that stupid myself!
Either way!
let’s apply our shader to a simple circle using the colorEffect(_:isEnabled:) modifier!
let colorShader: Shader = Shader(
    function: ShaderFunction(library: .default, name: "checkerboard"),
    arguments: [.float(checkerSize), .float(checkerOpacity)]
)

Circle()
    .fill(.green)
    .frame(width: 120)
    .colorEffect(colorShader)
Yeah!
Now that we get a little better understanding (hopefullly) on how metal shader comes together with SwiftUI views, let’s check out the remaining two!
Distortion Effect
Just like the name suggests, distortionEffect(_:maxSampleOffset:isEnabled:) returns a new view that applies shader to the view as a geometric distortion effect on the location of each pixel.
Shader Function
This time, the function signature should look like following to be able to act as a distortion effect.
[[ stitchable ]] float2 name(float2 position, args...)
We again have that float2 position representing the destination pixel in user-space coordinates. This time, we are returning a float2, the new position (coordinate) of that source pixel .
A simple rainbow, or actually, just a circle…
[[ stitchable ]] float2 rainbow(float2 position, float viewWidth, float maxHeightOffset) {
    float newPositionY =  sqrt(pow(maxHeightOffset, 2) - pow(position.x - viewWidth / 2, 2))  + position.y;
    return float2(position.x, newPositionY);
}
Apply Shader
To make things a little interesting, I am asking for viewWidth parameter here so that we can take a look at a little different way of applying the shader modifier!
You might want to use a GeometryReader, but there is a little better modifier for this purpose, the visualEffect(_:) for us to apply effects based on geometry!
Text("⭐ Distorted Itsuki ⭐")
    .padding()
    .background(RoundedRectangle(cornerRadius: 8).fill(.blue.opacity(0.3)))
    .visualEffect({ content, proxy in
        let maxHeightOffset: CGFloat = proxy.size.width / 2

        let distortionShader: Shader = Shader(
            function: ShaderFunction(library: .default, name: "rainbow"),
            arguments: [.float(proxy.size.width), .float(maxHeightOffset)]
        )

        return content
            .distortionEffect(distortionShader, maxSampleOffset: .init(width: .zero, height: maxHeightOffset))
            .offset(y: maxHeightOffset)

    })
Not a great rainbow, but anyway!
Now, obviously, in this case, we don’t have to use the visualEffect(_:) at all (nor geometry reader)! We can simply change the argument to a float4 representing the bounding rectangle of the view and use the boundingRect to create the argument! We can then retrieve the view width from the rectangle!
If you decided to go for this approach, you will HAVE TO move the distortionEffect outside, attaching it directly to the view, because boundingRect will be undefined for shaders that do not have a natural bounding rect (e.g. filter effects drawn into GraphicsContext).
Also, A little note on this maxSampleOffset. It is the maximum distance in each axis between the returned source pixel position and the destination pixel position, for all source pixels.
If we have set it to zero, our height will be cut off, to the view’s bound
Text("Distorted Itsuki")
  .padding()
  .background(RoundedRectangle(cornerRadius: 8).fill(.blue.opacity(0.3)))
  .visualEffect({ content, proxy in
      // ...

      return content
          .distortionEffect(distortionShader, maxSampleOffset: .zero)

  })
Combination of Color and Distortion
Before we move onto our final layerEffect(_:maxSampleOffset:isEnabled:) , let’s take a look at what will happen if we have combine the colorEffect(_:isEnabled:) with the distortionEffect(_:maxSampleOffset:isEnabled:).
I personally think that this really helps me understanding the way we should process those layers when we start writing our shader function for layerEffect!
VStack {
    Text("Color First")
        .font(.subheadline)
    Text("⭐ Itsuki ⭐")
        .padding()
        .background(RoundedRectangle(cornerRadius: 8).fill(.blue.opacity(0.3)))
        .visualEffect({ content, proxy in
                                let maxHeightOffset: CGFloat = proxy.size.width / 1.5

            let distortionShader: Shader = Shader(
                function: ShaderFunction(library: .default, name: "rainbow"),
                arguments: [.float(proxy.size.width), .float(maxHeightOffset)]
            )
            return content
                .colorEffect(colorShader)
                .distortionEffect(distortionShader, maxSampleOffset: .init(width: .zero, height: maxHeightOffset))
                .offset(y: maxHeightOffset)

        })
}

VStack {
    Text("Distortion First")
        .font(.subheadline)

    Text("⭐ Itsuki ⭐")
        .padding()
        .background(RoundedRectangle(cornerRadius: 8).fill(.blue.opacity(0.3)))
        .visualEffect({ content, proxy in
                                let maxHeightOffset: CGFloat = proxy.size.width / 1.5

            let distortionShader: Shader = Shader(
                function: ShaderFunction(library: .default, name: "rainbow"),
                arguments: [.float(proxy.size.width), .float(maxHeightOffset)]
            )
            return content
                .distortionEffect(distortionShader, maxSampleOffset: .init(width: .zero, height: maxHeightOffset))
                .colorEffect(colorShader)
                .offset(y: maxHeightOffset)

        })
}
Note how the modifier order matters a lot!
Let’s keep this somewhere in our mind and move onto writing our layer effect processing!
Layer Effect
I personally think of this layerEffect(_:maxSampleOffset:isEnabled:) as a combination of the colorEffect and the distortionEffect we had above! At least at a super high level!
It returns a new view that applies shader to the view as a filter on the raster layer created from self.
Shader Function
Again, starting with our function signature here!
For a shader function to act as a layer effect it must have a function signature.
[[ stitchable ]] half4 name(float2 position, SwiftUI::Layer layer, args...)
The float2 position is again the destination pixel in user-space coordinates.
The SwiftUI::Layer type is defined in the <SwiftUI/SwiftUI.h> header file, exporting a single sample() function that returns a linearly-filtered pixel value from a position in the source content, as a premultiplied RGBA pixel value.
namespace SwiftUI {
  struct Layer {
    half4 sample(float2 position) const;
  };
};
For the returning value, same as the shader function for the colorEffect, we are returning a half4 color here, the color mapping to the destination pixel, typically by sampling one or more pixels from layer at location(s) derived from position and them applying some kind of transformation to produce a new color.
Since I have said that I think of this layer effect as a combination of the distortion and color effect, let’s first rewrite our shader functions for color effect and distortion effect individually with the signature above to get an idea of how to use that sample function.
We will then combine those to create the exact same effects as if we had attach those two modifiers, Color first and distortion first.
First of all, let’s add the include the header file.
#include <SwiftUI/SwiftUI_Metal.h>
To create our checkerboard with the layer shader function signature, only one step more!
Get the current color using the sample function by providing the position!
[[ stitchable ]] half4 checkerboardWithLayer
(
 float2 position,
 SwiftUI::Layer layer,
 float viewWidth,
 float maxHeightOffset,
 float checkSize,
 float opacity
 ) {
    half4 currentColor = layer.sample(position);
    uint2 posInChecks = uint2(position.x / checkSize, position.y / checkSize);
    bool isOpaque = (posInChecks.x ^ posInChecks.y) & 1;
    return isOpaque ? currentColor * opacity : currentColor;
}
We can also rewrite our rainbow above using this layer!
We calculate the new position in the exact same way as above. We then use the sample function to get the color to return.
// same effect as the distortionEffect with rainbow
[[ stitchable ]] half4 rainbowWithLayer
(
 float2 position,
 SwiftUI::Layer layer,
 float viewWidth,
 float maxHeightOffset,
 float checkSize,
 float opacity
 ) {
    float newPositionY =  sqrt(pow(maxHeightOffset, 2) - pow(position.x - viewWidth / 2, 2))  + position.y;
    float2 newPosition = float2(position.x, newPositionY);
    half4 currentColor = layer.sample(newPosition);
    return currentColor;
}
(You can apply the layerEffect right in the exact same way we had for the other two to check it out, or you can just trust me here! They provides the same effects!)
Now, Time for the combination!
// same effect as applying distortionEffect with rainbow and then colorEffect with checkerboard
[[ stitchable ]] half4 rainbowCheckerboard
(
 float2 position,
 SwiftUI::Layer layer,
 float viewWidth,
 float maxHeightOffset,
 float checkSize,
 float opacity
 ) {
    // make rainbow
    float newPositionY =  sqrt(pow(maxHeightOffset, 2) - pow(position.x - viewWidth / 2, 2))  + position.y;
    float2 newPosition = float2(position.x, newPositionY);

    // key difference
    // calculate from original position instead of new location
    uint2 posInChecks = uint2(position.x / checkSize, position.y / checkSize);

    // make checkerboard
    half4 currentColor = layer.sample(newPosition);
    bool isOpaque = (posInChecks.x ^ posInChecks.y) & 1;
    return isOpaque ? currentColor * opacity : currentColor;
}


// same effect as applying colorEffect with checkerboard and then distortionEffect with rainbow
[[ stitchable ]] half4 checkerboardRainbow
(
 float2 position,
 SwiftUI::Layer layer,
 float viewWidth,
 float maxHeightOffset,
 float checkSize,
 float opacity
 ) {
    // make rainbow
    float newPositionY =  sqrt(pow(maxHeightOffset, 2) - pow(position.x - viewWidth / 2, 2))  + position.y;
    float2 newPosition = float2(position.x, newPositionY);

    // key difference
    // calculate from new position instead of original location
    uint2 posInChecks = uint2(newPosition.x / checkSize, newPosition.y / checkSize);

    // make checkerboard
    half4 currentColor = layer.sample(newPosition);
    bool isOpaque = (posInChecks.x ^ posInChecks.y) & 1;
    return isOpaque ? currentColor * opacity : currentColor;
}
Wait! Almost the same?
This is the line that makes the difference, of course, in this case!
- uint2 posInChecks = uint2(position.x / checkSize, position.y / checkSize);
+ uint2 posInChecks = uint2(newPosition.x / checkSize, newPosition.y / checkSize);
Whether if we are calculating the posInChecks (the checker that the given pixel belongs to), and thus effect the isOpaque value, from the original position or the new position.
Apply Effect
Nothing special!
Just add that visualEffect(_:) modifier to the view!
HStack(spacing: 48) {

    VStack {

        Text("Color First")
            .font(.subheadline)

        Text("⭐ Itsuki ⭐")
            .padding()
            .background(RoundedRectangle(cornerRadius: 8).fill(.blue.opacity(0.3)))
            .visualEffect({ content, proxy in
                let maxHeightOffset: CGFloat = proxy.size.width / 1.5

                let layerShader: Shader = Shader(
                    function: ShaderFunction(library: .default, name: "checkerboardRainbow"),
                    arguments: [.float(proxy.size.width), .float(maxHeightOffset), .float(checkerSize), .float(checkerOpacity)]
                )

                return content
                    .layerEffect(layerShader, maxSampleOffset: .init(width: .zero, height: maxHeightOffset))
                    .offset(y: maxHeightOffset)

            })
    }

    VStack {

        Text("Distortion First")
            .font(.subheadline)

        Text("⭐ Itsuki ⭐")
            .padding()
            .background(RoundedRectangle(cornerRadius: 8).fill(.blue.opacity(0.3)))
            .visualEffect({ content, proxy in
                let maxHeightOffset: CGFloat = proxy.size.width / 1.5

                let layerShader: Shader = Shader(
                    function: ShaderFunction(library: .default, name: "rainbowCheckerboard"),
                    arguments: [.float(proxy.size.width), .float(maxHeightOffset), .float(checkerSize), .float(checkerOpacity)]
                )

                return content
                    .layerEffect(layerShader, maxSampleOffset: .init(width: .zero, height: maxHeightOffset))
                    .offset(y: maxHeightOffset)

            })
    }
}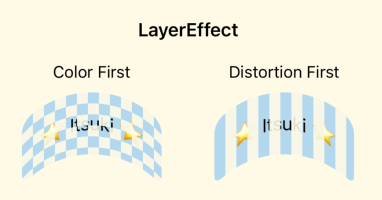
Honestly speaking, I will probably try to avoid using layerEffect if what I want can be achieved by using a combination of colorEffect and distortionEffect. It is just a lot easier in terms of writing those shader functions! At least for me!
Animations
Last but not least, let’s finish it up with some animations!
Depending on what we are trying to achieve here, there are couple choices!
With State Variable
Obvious enough, since we are in the SwiftUI World, we can animate with state variable by simple changing the value of it within an withAnimation!
That can be the isEnabled parameter of the modifier, or any of the arguments!
@State private var enableShader = false
@State private var animatableCheckerSize: CGFloat = 5
//...
HStack {
    VStack {
        Text("On `isEnable`")
            .font(.subheadline)

        Text("⭐ Animation ⭐")
            .padding()
            .background(RoundedRectangle(cornerRadius: 8).fill(.blue.opacity(0.3)))
            .colorEffect(colorShader, isEnabled: self.enableShader)
            .onAppear {
                withAnimation(.linear(duration: 5)) {
                    self.enableShader = true
                }
            }

    }

    VStack {
        Text("On Argument")
            .font(.subheadline)

        Text("⭐ Animation ⭐")
            .padding()
            .background(RoundedRectangle(cornerRadius: 8).fill(.blue.opacity(0.3)))
            .colorEffect(Shader(
                function: ShaderFunction(library: .default, name: "checkerboard"),
                arguments: [.float(animatableCheckerSize), .float(checkerOpacity)]
            ))
            .onAppear {
                withAnimation(.linear(duration: 5)) {
                    self.animatableCheckerSize = 15
                }
            }
    }

}

However, there are couple scenarios that this method will not work or not preferred!
- Indefinite animation
- Heavily time based
- When used within the visualEffect(_:) modifier. Main actor-isolated property … cannot be referenced from a Sendable closure; this is an error in the Swift 6 language mode.
With Timeline View
So!
Another approach here will be to use a TimelineView!
let start = Date().timeIntervalSince1970
TimelineView(.animation) { context in
    let timestamp = context.date.timeIntervalSince1970 - start

    return Text("⭐ Animation ⭐")
        .padding()
        .background(RoundedRectangle(cornerRadius: 8).fill(.blue.opacity(0.3)))
        .visualEffect({ content, proxy in
            var factor = timestamp / 2
            if factor >= 1 {
                factor = factor.truncatingRemainder(dividingBy: 1)
            }

            let maxHeightOffset: CGFloat = min(proxy.size.width / 1.5, proxy.size.width / 1.5 * factor)

            let distortionShader: Shader = Shader(
                function: ShaderFunction(library: .default, name: "rainbow"),
                arguments: [.float(proxy.size.width), .float(maxHeightOffset)]
            )

            return content
                .distortionEffect(distortionShader, maxSampleOffset: .init(width: .zero, height: maxHeightOffset))
                .offset(y: maxHeightOffset)

        })
}

Now, here my animation is repetitive and never end so this would be fine, but what if we want to stop it at some point in time, after a specific condition reached?
In order to achieve this, we can create the schedule with animation(minimumInterval:paused:) instead.
@State private var enableTimeline = true

// ...
let start = Date().timeIntervalSince1970
  if self.enableTimeline {
      TimelineView(.animation(minimumInterval: nil, paused: !self.enableTimeline)) { context in
          let timestamp = context.date.timeIntervalSince1970 - start
          let factor = timestamp / 2
          if factor > 1 {
              DispatchQueue.main.async {
                  self.enableTimeline = false
              }
          }


          return Text("⭐ Animation ⭐")
              .padding()
              .background(RoundedRectangle(cornerRadius: 8).fill(.blue.opacity(0.3)))
              .visualEffect({ content, proxy in
                  let maxHeightOffset: CGFloat = min(proxy.size.width / 1.5, proxy.size.width / 1.5 * factor)

                  let distortionShader: Shader = Shader(
                      function: ShaderFunction(library: .default, name: "rainbow"),
                      arguments: [.float(proxy.size.width), .float(maxHeightOffset)]
                  )

                  return content
                      .distortionEffect(distortionShader, maxSampleOffset: .init(width: .zero, height: maxHeightOffset))
                      .offset(y: maxHeightOffset)

              })
      }
  } else {
      Text("⭐ Animation ⭐")
          .padding()
          .background(RoundedRectangle(cornerRadius: 8).fill(.blue.opacity(0.3)))
          .visualEffect({ content, proxy in
              let maxHeightOffset: CGFloat = proxy.size.width / 1.5

              let distortionShader: Shader = Shader(
                  function: ShaderFunction(library: .default, name: "rainbow"),
                  arguments: [.float(proxy.size.width), .float(maxHeightOffset)]
              )

              return content
                  .distortionEffect(distortionShader, maxSampleOffset: .init(width: .zero, height: maxHeightOffset))
                  .offset(y: maxHeightOffset)

          })
  }

}
Why do we need that else statement?
Because when we paused the time line, unfortunately , the view with in it will also not be rendered!
Now!
The animation I had here is pretty simple, ie: just changing the maxHeightOffset based on the time, so I have calculated it inside SwiftUI and pass the maxHeightOffset as an argument to the shader function.
HOWEVER!
If your calculation is complex and heavy, or can be performed directly on vectors (instead of individual components), pass in the time directly to those shader functions as an argument is probably preferred! They use GPUs!
Thank you for reading!
That’s it for the code!
Here is a little Final note!
Views backed by AppKit or UIKit views may not render into the filtered layer. Instead, they log a warning and display a placeholder image to highlight the error.
Again, feel free to grab the full code from my GitHub!
I don’t know about you but I definitely fall in love with metal and think that it deserves more of my time!
If you are with me, Apple has provided a large amount of samples Metal Sample Code Library for us to check out!
Planning on sharing with you more about this super powerful Metal!
Stay tuned if you are interested!
Happy effecting!
SwiftUI: Get Start With Metal Shader Using Layer Effect Modifiers was originally published in Level Up Coding on Medium, where people are continuing the conversation by highlighting and responding to this story.
This content originally appeared on Level Up Coding – Medium and was authored by Itsuki