This content originally appeared on Level Up Coding – Medium and was authored by Ryo Kusnadi

Lately, the term Model Context Protocol (MCP) has been popping up more and more in software engineering circles. But what exactly is it — and why should developers care?
This article aims to answer three key questions:
- What is Model Context Protocol (MCP)?
- Why do we need it?
- How can developers use or build with MCP?
 What Is Model Context Protocol (MCP)?
Model Context Protocol (MCP) emerged as a response to the growing complexity of prompt engineering. As developers worked to improve the performance of large language models (LLMs), it became clear that providing more structured and relevant context significantly improves response quality.
 The Foundations: From Manual Prompts to MCP
To understand why Model Context Protocol (MCP) is important, let’s take a step back and look at how we used to provide context to large language models (LLMs), and how that process has evolved through RAG and function calling — leading to the need for something like MCP.
 Before MCP: Manual Prompts and Pain
Before solutions like RAG or function calling, feeding context to a model was a manual and error-prone process.
Imagine you’re building a chatbot that answers internal company questions. You’d likely:
- Query a database or open a document manually
- Copy the relevant information
- Paste it into the prompt before sending it to the model
This approach works in simple cases, but as the volume of data increases and tasks become more complex and dynamic, manually injecting context becomes:
- Time-consuming
- Difficult to maintain
- Inconsistent across users or sessions
You’re essentially writing a custom prompt for each request — and the system has no structured way to know where the information came from or how reliable it is.
 Retrieval-Augmented Generation (RAG): Context from Data
To solve this, RAG (Retrieval-Augmented Generation) was introduced. RAG enables the model to dynamically pull in external information that’s relevant to the user’s question.
Rather than hardcoding all relevant knowledge into the prompt, RAG uses a retriever model or search mechanism to:
- Interpret the user’s intent
- Search a predefined knowledge base (e.g., documents, wikis, databases)
- Retrieve the most relevant chunks
- Insert them into the prompt as additional context
 Example Workflow:
User: "How many vacation days do I get?"
→ System searches HR policy docs
→ Finds relevant paragraph
→ Adds: "According to company policy: Employees are entitled to 15 days of paid leave..."
→ LLM generates an answer based on that.
This technique improves accuracy and response quality without retraining the model. However, it’s still read-only — the model can see the data, but it can’t interact with systems or perform actions.
 Function Calling: From Passive Knowledge to Active Behavior
The next major step came when LLMs started being able to use tools, not just process text. This was made possible through function calling — a feature introduced by providers like OpenAI and Google.
With function calling, the model can:
- Recognize when it needs external help
- Call a predefined function or API
- Pass arguments in structured format (like JSON)
- Receive the result and incorporate it into the response
This unlocked agent-like behaviors. For instance, a model could:
- Look up the weather
- Query live stock prices
- Fetch a user’s profile from your database
Example Function Call Output:
{
  "function_call": {
    "name": "get_user_profile",
    "arguments": {
      "user_id": "123456"
    }
  }
}
Once again, this was a major leap forward. But now we had another problem: every platform had its own approach, and function definitions weren’t standardized. Developers were back to writing glue code to connect models, tools, and data sources.
 Enter MCP: A Common Language Between Apps and LLMs
In November 2024, Anthropic introduced Model Context Protocol (MCP) a proposed standard for how applications and LLMs can exchange structured context.
MCP defines a consistent and standardized way for apps to deliver structured context to AI models. It acts as an intermediate protocol layer between the model and the tools, resources, databases, functions, and user state it needs to interact with.
Just like USB-C unified the way we connect hardware devices, MCP aims to unify how we “plug in” context — making integration easier, cleaner, and more consistent across systems.
You can think of MCP as the “middleware” between your app and the LLM — a bridge that organizes and delivers structured context in a predictable, model-friendly way.
 MCP Enables:
- Structured, modular context delivery
- Integration of real-time tools (e.g., web search, databases)
- Easier agent-like behavior without hand-wired prompts
- Cross-platform compatibility between services that support MCP
Without MCP, tool and context integration is often fragmented and custom-built for each app or provider. Every model exposes APIs differently, every dev team reinvents the wheel, and codebases end up tightly coupled to specific implementations.
MCP solves this fragmentation by offering a shared language between apps and models — making advanced use cases like agent orchestration and dynamic tool chaining far more scalable.
It creates a middleware layer that lets developers define what context is needed, where it comes from, and how it should be used — all without hardcoding every edge case.
 MCP Architecture
Now this is where things start to get interesting.
To fully understand how MCP works in practice, we need to look at its internal structure.
At a high level, MCP isn’t just a wrapper for prompts or tools — it’s a structured protocol that defines how applications deliver context, expose capabilities, and interact with language models in a clean, extensible way.
Let’s walk through the core components that make up the MCP architecture.
 1. Host
The Host is the user-facing application that serves as the main environment for interacting with the language model. It handles input/output and contains the embedded MCP Client.
- Role: Interface between the user and the model
- Examples: Claude Desktop, Cursor, or any agent runtime that integrates MCP
- Function: Receives user input, sends it to the model, and displays the final response
 2. Client
The Client runs inside the Host and manages communication with one or more MCP Servers. It is responsible for service discovery, capability exchange, and message routing.
- Role: Communication layer between the model and available tools/resources
- Responsibilities:
- Initiates a capability exchange with MCP Servers
- Lists available tools and resources
- Routes tool calls and context to and from the model
 3. Server
The Server exposes capabilities to the model, including tools (functions), resources (data), and prompts (templates).
- Types of MCP Servers:
- Tools: Callable functions (e.g., get_weather, calculate_bmi)
- Resources: Documents, file systems, databases, APIs
- Prompts: Reusable templates to support structured reasoning
Each server registers its capabilities during the handshake process, which is known as Capability Exchange.
 Capability Exchange
Capability Exchange is a discovery mechanism through which the MCP Client queries available MCP Servers to learn what tools, prompts, and resources they support.
- Initiated by: Client
- Responded to by: Server (with supported methods, schemas, descriptions)
- Protocols supported:
- stdio – Local I/O communication
- SSE (Server-Sent Events) – Real-time HTTP streaming for remote servers
This handshake process enables the LLM to understand exactly what capabilities are available without hardcoding any logic.
 Data Format and Protocol
MCP uses JSON-RPC 2.0 as its messaging protocol to structure requests and responses between clients and servers. Messages follow a strict format that includes method names, parameters, and result or error payloads.
Example POST Request:
POST /messages HTTP/1.1
Content-Type: application/json
{
  "jsonrpc": "2.0",
  "method": "tools/list",
  "id": 1
}
Server Response (via SSE):
event: message
data: {
  "jsonrpc": "2.0",
  "id": 1,
  "result": {
    "tools": [
      {
        "name": "get_weather",
        "description": "Get current weather for a city",
        "inputSchema": {
          "type": "object",
          "properties": {
            "city": { "type": "string" }
          },
          "required": ["city"]
        }
      }
    ]
  }
}
 Tool Execution Lifecycle
- Tool Discovery: The Client sends a request (tools/list) to discover available tools.
- LLM Selection: The Client includes these tools in a prompt. The model selects a tool by returning a JSON block with a tool name and arguments.
- Execution: The Client parses the model’s response and executes the tool via the Server.
- Response Handling: The result is sent back to the model for final interpretation.
 How MCP Works
Here’s a high-level view of how the MCP client, server, and LLM interact:
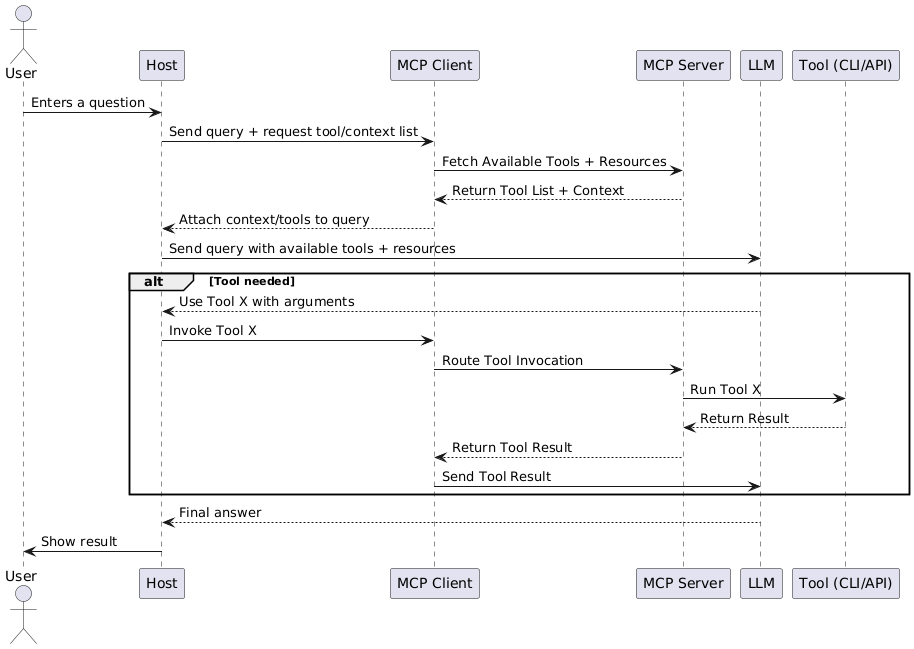
This diagram shows the flow of a typical MCP-based request: from context gathering to optional tool execution and result return. It demonstrates how MCP simplifies structured communication between your app and the model.
 Example Scenario
Let’s walk through a practical use case:
User: “What documents are on my desktop?”
- Host (Claude Desktop / Cursor) receives the user’s query
- Host analyzes the prompt and determines it needs local file system access.
- The embedded MCP Client initializes a connection to the file system MCP Server.
- Client and Server perform capability exchange.
- The Server provides a list of available tools (e.g., list_txt_files).
- The Client invokes the appropriate tool.
- The Server returns the result (list of desktop documents).
- Host uses that to generate a response.
- The Host displays the final answer to the user.
 How Can Developers Use or Build with MCP?
One of the easiest ways to start working with MCP today is through Cursor — a developer-first AI IDE that already supports MCP natively.
 Using MCP in Cursor
Cursor runs an embedded MCP client under the hood. When you ask the AI something like:
“Write unit tests for this function”
“What does this code depend on?”
“Scan my project for TODOs”
Here’s what’s actually happening behind the scenes:
- Cursor sends your query to the LLM (like Claude or GPT).
- It automatically discovers available tools and context via MCP.
- If needed, it invokes the right tool (e.g., file analyzer, dependency tree builder).
- The tool result is passed back to the model.
- The LLM uses that structured output to generate an accurate response.
 Building Custom Tools with MCP in Cursor
Want to integrate your own backend logic into Cursor’s AI workflow? You can do that by creating a custom MCP server using Python.
Here’s how:
 1. Install the Prerequisites
To create a custom MCP server for use in Cursor, you’ll need a Python project with the mcp library installed. I recommend you to use uv but you can use pip as well if you prefer.
If you don’t already have uv installed, here’s how:
- macOS (with Homebrew):
brew install astral-sh/astral/uv
- Or with curl (cross-platform):
curl -Ls https://astral.sh/uv/install.sh | sh
 Step-by-Step Setup
# 1. Initialize a new MCP project
mcp uv init mcp-demo
This sets up a basic project scaffold in a folder called mcp-demo.bash
# 2. Move into your project directory
cd mcp-demo
# 3. Create a virtual environment
uv venv
# 4. Activate the virtual environment
source .venv/bin/activate
Activating the environment ensures all packages are installed and run in isolation from your system Python
# 5. Add the core MCP package
uv add mcp
# 6. Add the CLI utilities for building and serving MCP tools
uv add 'mcp[cli]'
2. Create The Code
Now let’s build our tool.
We’ll split the code into two files for clarity:
 server.py
from mcp.server.fastmcp import FastMCP
import os

mcp = FastMCP()

@mcp.tool()
def list_text_files() -> list[dict]:
    """
    Lists all .txt files in the project folder.
    """
    files = []
    for root, _, filenames in os.walk("."):
        for fname in filenames:
            if fname.endswith(".txt"):
                full_path = os.path.join(root, fname)
                files.append({
                    "path": full_path,
                    "name": fname
                })
    return files

@mcp.tool()
def count_words_in_file(path: str) -> dict:
    """
    Count the number of words in a given file.
    """
    if not os.path.isfile(path):
        return {"error": f"File not found: {path}"}

    with open(path, "r", encoding="utf-8") as f:
        content = f.read()

    word_count = len(content.split())
    return {
        "file": path,
        "word_count": word_count
    }
 main.py
from server import mcp

if __name__ == "__main__":
    mcp.run(transport="stdio")
 Running the Server (Debug Purpose)
To run your tool locally and test outside of Cursor
uv run mcp dev main.py
This launches the MCP server in dev mode and prints any tool calls and results to your terminal.
Use the MCP Inspector (Debug Purpose)
When you run the dev server, you’ll see a local URL like this in your terminal:
🌐 Inspector available at: http://localhost:6274/?MCP_PROXY_AUTH_TOKEN=...
You can open this link in your browser to access the MCP Inspector — a built-in tool to manually test and explore your server.
How to Use It
- Open the Inspector URL in your browser
- Click Connect in the top right
- Click List Tools to view the tools your server exposes
- Select a tool like list_text_files or count_words_in_file
- Enter sample inputs (e.g., path to a .txt file) and run it
- See structured output in real time
 3. Enable It in Cursor
Once your MCP server is ready, you can make it available globally across all Cursor projects by adding it to your global Cursor config.
{
  "mcpServers": {
    "word-counter": {
      "command": "uv",
      "args": ["run", "python", "{FILE_PATH}/mcp-demo/main.py"]
    }
  }
}
This tells Cursor to launch your MCP server automatically and expose its tools to the in-editor AI assistant.
4. Restart Cursor
Once your server is defined, restart Cursor. It will:
- Detect your local MCP server
- Discover your list_text_files and count_words_in_file in tools
- Make it available to the LLM during your AI chats
You’ll now be able to type things like:
“List all text files in this folder”
“count words in this file”
Cursor will route the request through your MCP server, execute your Python tool, and return the results inline
By combining MCP and Cursor, you’re not just building software — you’re building smart, AI-augmented developer tools with almost no boilerplate.
 Final Thoughts
As software engineers, we spend a lot of time wiring up APIs, handling edge cases, and maintaining glue code. MCP changes that. It offers a cleaner, more consistent way to handle the everyday tasks we already do — now with language models in the loop.
As AI becomes part of the modern development stack, learning protocols like MCP isn’t optional — it’s the next step in how we build smarter, faster, and more maintainable systems.
A Simple Guide to Model Context Protocol for Software Engineers was originally published in Level Up Coding on Medium, where people are continuing the conversation by highlighting and responding to this story.
This content originally appeared on Level Up Coding – Medium and was authored by Ryo Kusnadi