This content originally appeared on Level Up Coding – Medium and was authored by Maruti Muthu
Minikube is an easy and flexible method to create a local Kubernetes setup. Minikube uses the default kubeadm bootstrapping tool, to initialise the control plane node during the init phase and grow the cluster by adding worker or control plane nodes with the join phase.

Today, we’ll set up a local Kubernetes development environment and launch a nginx app on a cluster. I’ll be doing this on a MacBook Air with an M1 chip. Since the M1 uses an ARM-based architecture and doesn’t support VirtualBox, we’ll need to use Docker as the driver. If you’re using macOS on Intel processors you can still use the VirtualBox hypervisor.
Before we dive in, I highly recommend installing Homebrew on your Mac. It makes managing and installing packages much easier and will streamline the setup process. Here’s a useful guide to setup Homebrew.
 Installation
Once Homebrew is installed, you can install everything with just a few terminal commands.
$ brew install --cask docker
$ brew install minikube
$ brew install kubectl
 Getting started
With the installation out of the way, let’s get hands on with Minikube. As Apple’s M architecture does not support VirtualBox, we have to explicitly mention docker as the driver for Minikube.
Minikube starts by creating a minikube cluster in the default namespace. Running the minikube status command shows the status of the cluster.
$ minikube start --driver=docker
😄 minikube v1.32.0 on Darwin 12.3
✨ Using the docker driver based on user configuration
👍 Starting control plane node minikube in cluster minikube
🚜 Pulling base image ...
   > gcr.io/k8s-minikube/kicbase...: 1.62 KiB / 453.90 MiB [>_] 0.00% ? p/s ?
💾 Downloading Kubernetes v1.33.1 preload ...
   > gcr.io/k8s-minikube/kicbase...: 453.90 MiB / 453.90 MiB 100.00% 7.55 Mi
   > preloaded-images-k8s-v18-v1...: 372.28 MiB / 372.28 MiB 100.00% 5.82 Mi
🔥 Creating docker container (CPUs=2, Memory=8000MB) ...
🐳 Preparing Kubernetes v1.33.1 on Docker 24.0.7 ...
   ▪ Generating certificates and keys ...
   ▪ Booting up control plane ...
   ▪ Configuring RBAC rules ...
🔗 Configuring bridge CNI (Container Networking Interface) ...
🔎 Verifying Kubernetes components...
   ▪ Using image gcr.io/k8s-minikube/storage-provisioner:v5
🌟 Enabled addons: storage-provisioner, default-storageclass
💡 kubectl not found. If you need it, try: 'minikube kubectl -- get pods -A'
🏄 Done! kubectl is now configured to use "minikube" cluster and "default" namespace by default

$ minikube status
minikube
type: Control Plane
host: Running
kubelet: Running
apiserver: Running
kubeconfig: Configured

# Use this to stop the cluster
$ minikube stop
✋  Stopping node "minikube"  ...
🛑  1 nodes stopped.

# Use this to delete the cluster
$ minikube delete
🔥 Deleting "minikube" in docker ...
💀 Removed all traces of the "minikube" cluster.
 Minikube Profiles
The minikube profile command allows us to view the status of all our clusters in a table formatted output. Assuming we have created only the default minikube cluster, we could list the properties that define the default profile with:
$ minikube profile list
|----------|------------|---------|----------------|------|---------|---------|-------|--------|
| Profile  | VM Driver  | Runtime |       IP       | Port | Version | Status  | Nodes | Active |
|----------|------------|---------|----------------|------|---------|---------|-------|--------|
| minikube |   docker   | docker  |  192.168.49.2  | 8443 | v1.33.1 | Running |     1 | *      |
|----------|------------|---------|----------------|------|---------|---------|-------|--------|
We can setup another cluster with a different kubernetes version, driver and number of nodes. Advanced users can also configure the Container Runtime, Container Network Interface (CNI), disk size, cpus and memory.
$ minikube start --nodes=2 --kubernetes-version=v1.28.1 \
  --driver=docker --profile doubledocker
|--------------|-----------|---------|--------------|------|---------|--------|-------|----------------|--------------------|
|   Profile    | VM Driver | Runtime |      IP      | Port | Version | Status | Nodes | Active Profile | Active Kubecontext |
|--------------|-----------|---------|--------------|------|---------|--------|-------|----------------|--------------------|
| doubledocker | docker    | docker  | 192.168.58.2 | 8443 | v1.33.1 | OK     |     2 |                | *                  |
| minikube     | docker    | docker  | 192.168.49.2 | 8443 | v1.33.1 | OK     |     1 | *              |                    |
|--------------|-----------|---------|--------------|------|---------|--------|-------|----------------|--------------------|

# To set doubledocker as the active profile:
$ minikube profile doubledocker
✅  minikube profile was successfully set to doubledocker

# Advanced command would look something like this!
$ minikube start --driver=docker --nodes=3 --disk-size=10g \
  --cpus=2 --memory=6g --kubernetes-version=v1.27.12 --cni=calico \
  --container-runtime=cri-o -p multivbox
We can explore the nodes on the cluster using the following commands:
$ minikube node list
doubledocker 192.168.58.2
doubledocker-m02 192.168.58.3

# -p flag is used to pass another profile which is not in context
$ minikube node list -p minikube
minikube 192.168.49.2

$ minikube ip
192.168.58.2

$ minikube -p minikube ip
192.168.49.2

# -n flag is used to pass the nodename
$ minikube -p doubledocker ip -n doubledocker-m02
192.168.58.3
 Setting up a Kubernetes Dashboard
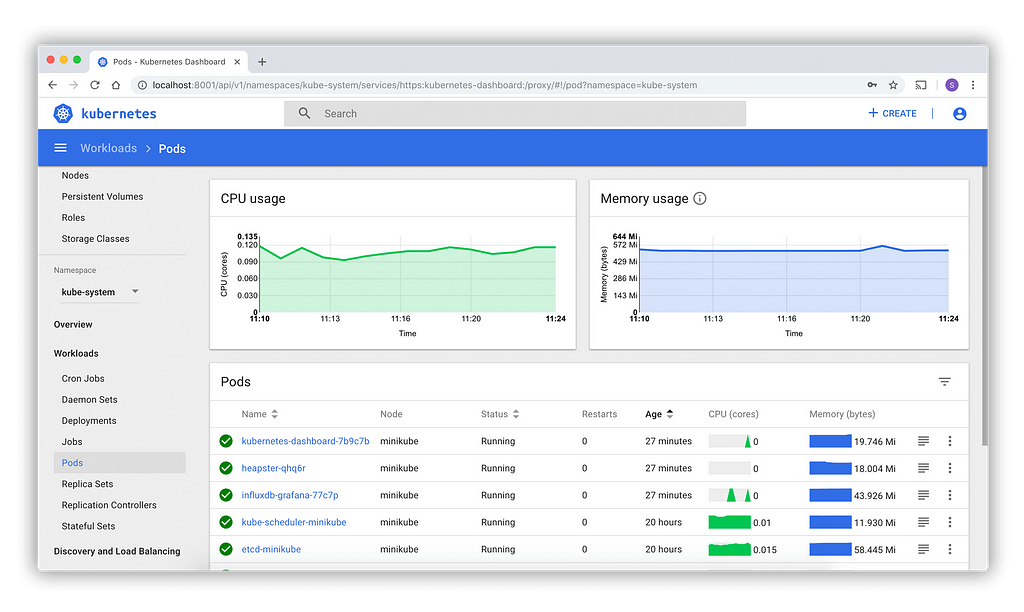
The Kubernetes Dashboard provides a web-based user interface for Kubernetes cluster management. Minikube installs the Dashboard as an addon, but it is disabled by default. Prior to using the Dashboard we are required to enable the Dashboard addon, together with the metrics-server addon, a helper addon designed to collect usage metrics from the Kubernetes cluster.
To access the dashboard from Minikube, we can use the minikube dashboard command, which opens a new tab in our web browser displaying the Kubernetes Dashboard, but only after we list, enable required addons, and verify their state:
$ minikube addons list

$ minikube addons enable metrics-server

$ minikube addons enable dashboard

$ minikube dashboard

# If the URL is not displayed use the following command:
$ minikube dashboard --url
 Try a Quick Deployment
You can use the Dashboard to create a new resource using the + button on the top right. If you’re getting started, ‘create from form’ option is the easiest way to deploy a resource.
Let’s deploy a simple NGINX server to test the setup:
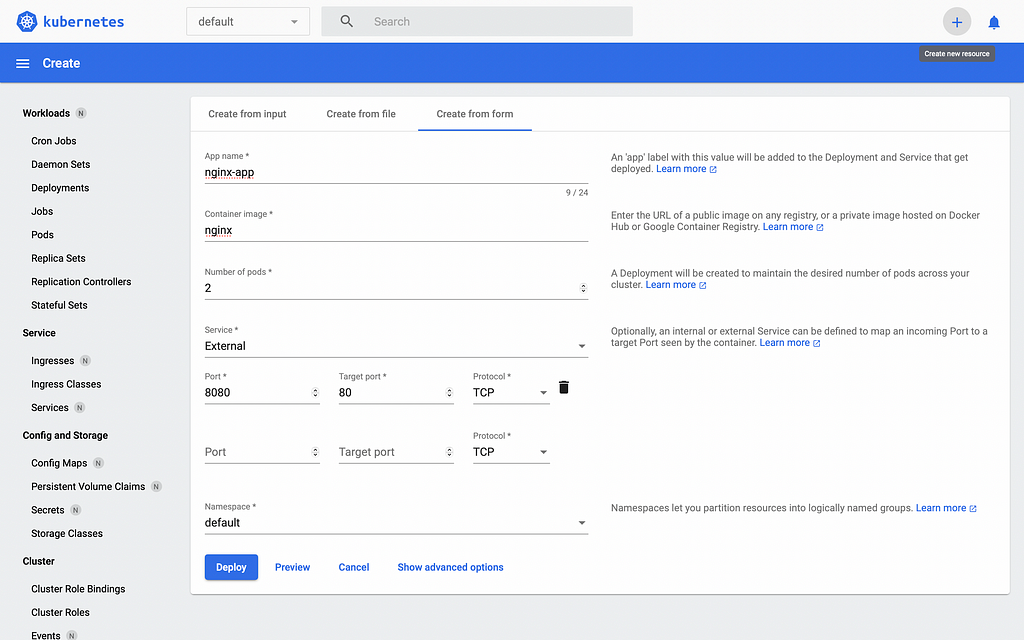
First we’ll have to set the profile context to minikube. To access the nginx app we run the minikube service command. This serves the ‘Welcome to nginx!’ page on http://127.0.0.1:54422.
$ minikube profile minikube
✅  minikube profile was successfully set to minikube

$ minikube service nginx-app
|-----------|-----------|------------------------|---------------------------|
| NAMESPACE |   NAME    |      TARGET PORT       |            URL            |
|-----------|-----------|------------------------|---------------------------|
| default   | nginx-app | tcp-8080-80-j7v5w/8080 | http://192.168.49.2:32702 |
|-----------|-----------|------------------------|---------------------------|
🏃  Starting tunnel for service nginx-app.
|-----------|-----------|-------------|------------------------|
| NAMESPACE |   NAME    | TARGET PORT |          URL           |
|-----------|-----------|-------------|------------------------|
| default   | nginx-app |             | http://127.0.0.1:54422 |
|-----------|-----------|-------------|------------------------|
🎉  Opening service default/nginx-app in default browser...
❗  Because you are using a Docker driver on darwin, the terminal needs to be open to run it.
 Parting thoughts
Setting up a local Kubernetes environment with Minikube is a smooth and effective way to get started with Kubernetes development. Whether you’re experimenting with workloads or learning the basics of container orchestration, Minikube is a powerful tool right at your fingertips.
Got feedback or questions? Drop them in the comments — I’d love to hear how your setup went!
Minikube 101: Your Local Kubernetes Playground was originally published in Level Up Coding on Medium, where people are continuing the conversation by highlighting and responding to this story.
This content originally appeared on Level Up Coding – Medium and was authored by Maruti Muthu